This is one of the more common alerts that may come up when you activate Defender for Cloud. This message comes up when a vulnerability assessment solution is not found in at least one virtual machine in your environment.
What happens behind the curtains? Azure virtual machine servers are constantly checked for infrastructure security misconfigurations by Defender for Cloud, which offers advice on how to fix them. Through integrated Vulnerability Assessment solutions or via agents and extensions, Defender for Cloud can also report on vulnerabilities found and the OS or application level. Since these “agents” must be configured for the process to work, you should configure the automatic provisioning of vulnerability assessment solutions on your virtual machines.
A valid VA solution is one of the following:
Microsoft threat and vulnerability management, included in both the Defender for Servers plans (P1 and P2). This is now the suggested solution, especially if you already use Microsoft Defender for Endpoint. You should not confuse this with the Microsoft Defender Vulnerability Management Add-on, which has a really similar name but is a different feature included with Defender for Servers Plan 2.
The Qualys agent, also included in Defender for Servers, but just in Defender for Servers Plan 2. This used to be the default choice in the past.
As we said, Microsoft threat and vulnerability management is the default solution to fix this recommendation. The only case I would use something else is if you already have Qualys or Rapid 7 in your environment and want to manage everything from a single pane. Defender for Endpoint will be onboarded in the VM through the MDE.Windows extension.
Step-by-step guide
To automatically enable a vulnerability assessment solution and resolve the alert:
Search Defender for Cloud from the Azure Portal (portal.azure.com)
From Defender for Cloud’s menu, click on Environment settings from the left bar.
Click on the subscription the resource is in.
In the top bar, click on Settings & Monitoring.
Turn on (if it’s not already enabled) the vulnerability assessment for machines and select the solution you wish to use. I’ll enable Microsoft Defender vulnerability management.
In March 2022, Intune added support for Chrome Administrative Templates. This allows for further customization of your Chrome installation without needing the custom ADMX and the OMA-URIs.
This post will show how to configure the silent installation of an extension in Chrome using Administrative Templates. If you are using ADMX policies, consider switching to this or Settings Catalogs. If you are already leveraging Settings Catalogs, you should go that way and build this policies as settings catalogs.
Select Create Profile, then on platform click on Windows 10 and later.
The profile type will be Templates. Then select Administrative Templates.
Click on Create, then give the policy a name.
Under Computer Configuration, select Google, then select either Google Chrome or Google Chrome – Default settings. The first will not let users modify the policies; the second will give users freedom to change the settings you set. You’ll usually go with the first one.
Click Extensions, then select Configure the list of force-installed apps and extensions.
Once you have the policy open, you’ll need to set it to Enabled, then insert the Extension ID of the extension you want to provision. For this article, I’ll be using uBlock Origin, which I highly suggest, and has cjpalhdlnbpafiamejdnhcphjbkeiagm as ID.
If you want to retrieve the ID of an extension, head to the Chrome web store and search for the app you wish to install. From there, look at the address bar. The end of the URL is the ID you are looking for. Refer to the screenshot below. If you want to retrieve the ID of an extension, head to the Chrome web store, and search for the app you wish to install. From there, look at the address bar. The end of the URL is the ID you are looking for. In our example, the ID is cjpalhdlnbpafiamejdnhcphjbkeiagm, as shown in the picture below.
Sometimes the Chrome web store attaches a “?hl=XX” at the end of the URL, which references the host language. XX in this example can be something like it, de, or similar, depending on your host language. This is NOT part of the ID and should not be copied over to Intune.
Once you have pasted your IDs into the Intune policy, click Ok, then Next.
From there on, scope the policy as needed in the Assignments tab, click Next, and Create.
Microsoft’s description of the policy
Here is Microsoft’s description of the policy “Configure the list of force-installed apps and extensions”:
Setting the policy specifies a list of apps and extensions that install silently, without user interaction, and which users can’t uninstall or turn off. Permissions are granted implicitly, including for the enterprise.deviceAttributes and enterprise.platformKeys extension APIs. (These 2 APIs aren’t available to apps and extensions that aren’t force-installed.) Leaving the policy unset means no apps or extensions are autoinstalled, and users can uninstall any app or extension in Google Chrome. This policy superseeds ExtensionInstallBlocklist policy. If a previously force-installed app or extension is removed from this list, Google Chrome automatically uninstalls it. On Microsoft® Windows® instances, apps and extensions from outside the Chrome Web Store can only be forced installed if the instance is joined to a Microsoft® Active Directory® domain, running on Windows 10 Pro, or enrolled in Chrome Browser Cloud Management. On macOS instances, apps and extensions from outside the Chrome Web Store can only be force installed if the instance is managed via MDM, or joined to a domain via MCX. The source code of any extension may be altered by users through developer tools, potentially rendering the extension dysfunctional. If this is a concern, set the DeveloperToolsDisabled policy. Each list item of the policy is a string that contains an extension ID and, optionally, an “update” URL separated by a semicolon (;). The extension ID is the 32-letter string found, for example, on chrome://extensions when in Developer mode. If specified, the “update” URL should point to an Update Manifest XML document ( https://developer.chrome.com/extensions/autoupdate ). By default, the Chrome Web Store’s update URL is used. The “update” URL set in this policy is only used for the initial installation; subsequent updates of the extension use the update URL in the extension’s manifest. Note: This policy doesn’t apply to Incognito mode. Read about hosting extensions ( https://developer.chrome.com/extensions/hosting ). Example value: aaaaaaaaaaaaaaaaaaaaaaaaaaaaaaaa;https://clients2.google.com/service/update2/crx abcdefghijklmnopabcdefghijklmnop
Other useful extension settings
A basic Chrome extension configuration is usually set like this. You’ll block external extensions from being configured, you’ll only allow installing corporate-allowed applications, and you’ll force some extensions to the devices. Here you can find the policies’ names:
Blocks external extensions from being installed
Configure extension installation allow list
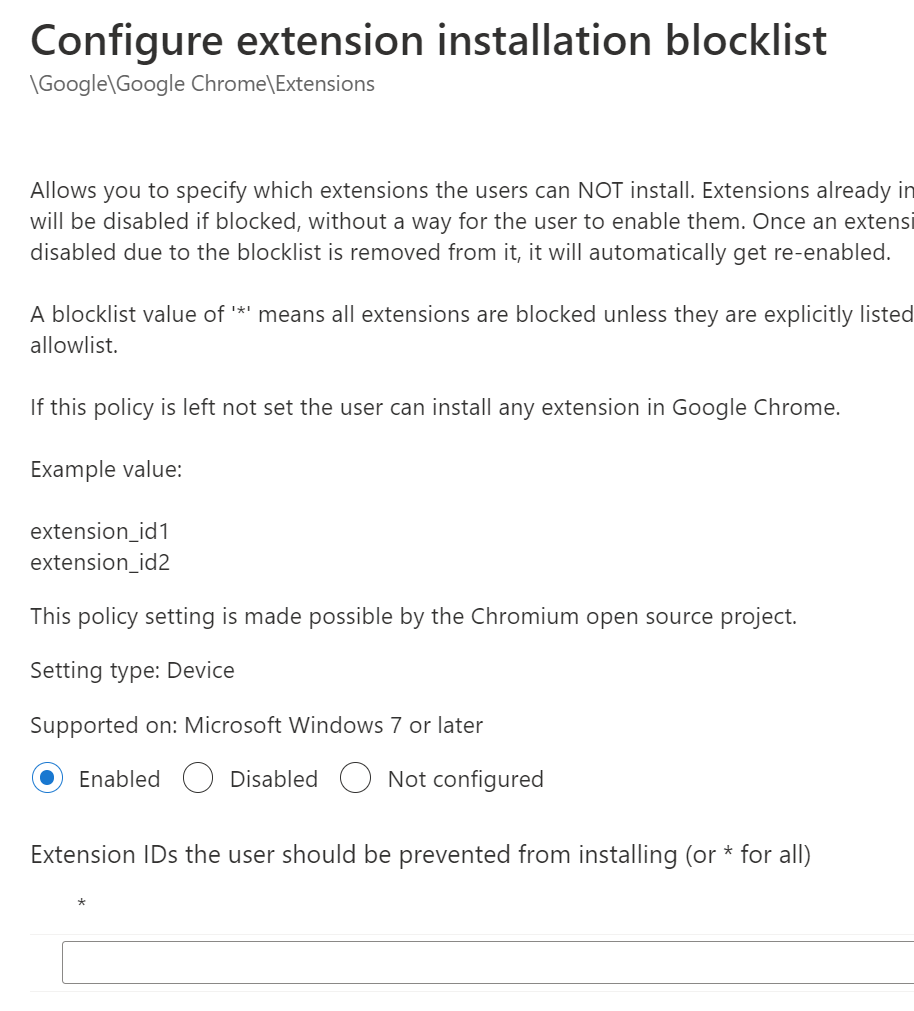
Configure extension installation blocklist
Configure the list of force-installed apps and extensions
Only allow approved extensions
First, we are going to configure the two following policies:
Configure extension installation allow list
Configure extension installation blocklist
The first one will be the allow list, and then we are going to block everything else from being run. The extensions you forced before with the silent install are automatically allowed. I’d still advise for adding them to this policy using the ID you retrieved before.
Use the following screenshot for reference.
The blocklist is usually configured as *, meaning any. All the allow-listed and forced extensions will be automatically excluded and take precedence. If you just wish to block some applications, paste the ID of the extensions you wish to block.
Block external extensions
Last but not least, let’s block external extensions. These are applications that can be manually packaged and installed into browsers. If you are not actively deploying some in your organization, I’d suggest blocking them.