The following policies named “Standard Recommended Policy” or “Strict Recommended Policy” already exist


General Introduction

On a customer implementation I found the following error while trying to configure the Microsoft Baselines for Defender for Office 365:

The follow policies named “Standard Recommended Policy” or “Strict Recommended Policy” already exists. Please remove it first. HostedContentFilterPolicy


Guide

To fix the issue first open PowerShell and connect to Exchange Online. If you don’t have the module installed launch the following commands:

Set-ExecutionPolicy RemoteSigned
Install-Module PowershellGet
Install-Module -Name ExchangeOnlineManagement

Then connect to connect to Exchange Online with Powershell run the following command, modifying the username first:

Connect-ExchangeOnline -UserPrincipalName admin@azvise.com

Then run:

Get-HostedContentFilterPolicy

This will show the currently configured policies.

If you already have a Standard Preset Security Policy run the following to remove it:

Get-HostedContentFilterPolicy | Where Name -eq "Standard Preset Security Policy" | Remove-HostedContentFilterPolicy

If you already have a Strict Preset Security Policy run the following to remove it:

Get-HostedContentFilterPolicy | Where Name -eq "Strict Preset Security Policy" | Remove-HostedContentFilterPolicy

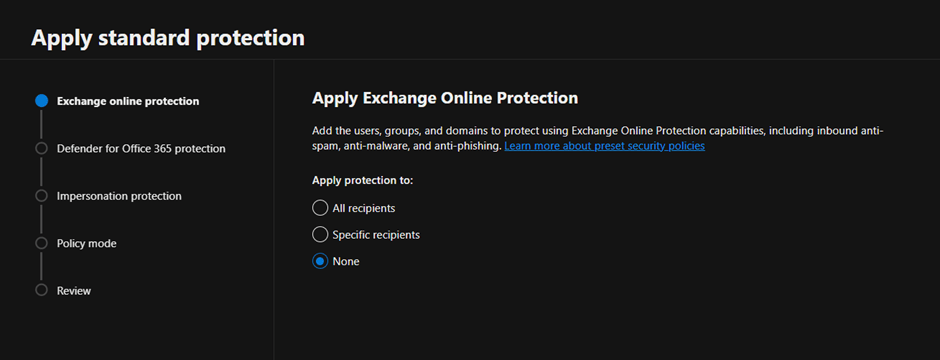
This should fix the issue. When you refresh your browser you should be able to configure the Preset Policies. Once completed, the new policies will show up.

Onboard on-prem servers directly to Defender for Servers

  1. General Introduction
  2. Must Know
  3. How to enable Direct Onboarding
  4. How to onboard servers
  5. Notes

General Introduction

If you want to onboard on-prem servers directly to Defender for Servers, you can now do so with the Defender for Endpoint agent. This has the advantage of being able to license and activate Microsoft Defender for Endpoint on servers without having to use Azure Arc. While full of useful functionalities, Arc, among others, gives you remote management of your servers and must be therefore treated carefully. 

If you enable direct onboarding (a tenant-level feature) and onboard your servers to MDE, they’ll show up in Defender for Cloud and be enabled to Defender for Servers. Still, you’ll have to onboard your servers with Arc to get the most out of Defender for Servers, such as the features in Plan 2.
Defender for Servers Plan 1 include the following functionalities:

Image credits to m365maps.com

Direct onboarding is a seamless integration between Defender for Endpoint and Defender for Cloud that doesn’t require extra software deployment on your servers. Once enabled, it also shows your non-Azure server devices onboarded to Defender for Endpoint in Defender for Cloud

https://learn.microsoft.com/en-us/azure/defender-for-cloud/onboard-machines-with-defender-for-endpoint

Must Know

  • The feature will be enabled tenant level.
  • Both new and existing servers will be onboarded to Defender for Servers.
  • It’s fully supported by Defender for Servers Plan 1. Plan 2 features are not supported.

How to enable Direct Onboarding

  • Head into portal.azure.com
  • Search for Defender for Cloud and open it.
  • Click on Environment Settings 
  • Select Direct Onboarding in the middle of the screen.
  • Set Direct onboarding to On and select the billing subscription. In this subscription you’ll get a “Servers – Defender for Endpoint” object which references the on-prem server enabled to Defender for Servers.
  • Save
  • Check if Direct onboarding enabled Defender for Servers Plan 1 on that subscription.
  • To check, go into Environment settings, select the subscription you have used for enabling Direct onboarding
  • From Defender plans, look for Servers, then make sure it’s enabled and Plan 1 is selected
  • Wait for the servers to show up.

How to onboard servers

Notes

Here are the Microsoft Docs:

https://learn.microsoft.com/en-us/azure/defender-for-cloud/onboard-machines-with-defender-for-endpoint


To onboard using Azure Arc, follow this documentation:

https://learn.microsoft.com/en-us/azure/defender-for-cloud/quickstart-onboard-machines

A vulnerability assessment solution should be enabled on your virtual machines – Azure

  1. General introduction
  2. Step-by-step guide
  3. Sources

General introduction

This is one of the more common alerts that may come up when you activate Defender for Cloud. This message comes up when a vulnerability assessment solution is not found in at least one virtual machine in your environment.

What happens behind the curtains? Azure virtual machine servers are constantly checked for infrastructure security misconfigurations by Defender for Cloud, which offers advice on how to fix them. Through integrated Vulnerability Assessment solutions or via agents and extensions, Defender for Cloud can also report on vulnerabilities found and the OS or application level. Since these “agents” must be configured for the process to work, you should configure the automatic provisioning of vulnerability assessment solutions on your virtual machines.

A valid VA solution is one of the following:

  • Microsoft threat and vulnerability management, included in both the Defender for Servers plans (P1 and P2). This is now the suggested solution, especially if you already use Microsoft Defender for Endpoint. You should not confuse this with the Microsoft Defender Vulnerability Management Add-on, which has a really similar name but is a different feature included with Defender for Servers Plan 2.
  •  The Qualys agent, also included in Defender for Servers, but just in Defender for Servers Plan 2. This used to be the default choice in the past.
  •  A Bring Your Own License Qualys or Rapid7 agent configured to integrate with Defender for Cloud. If you are looking at ways to incorporate them, follow this article: Integrate security solutions in Microsoft Defender for Cloud | Microsoft Docs

As we said, Microsoft threat and vulnerability management is the default solution to fix this recommendation. The only case I would use something else is if you already have Qualys or Rapid 7 in your environment and want to manage everything from a single pane. Defender for Endpoint will be onboarded in the VM through the MDE.Windows extension.

Step-by-step guide

To automatically enable a vulnerability assessment solution and resolve the alert:

  • Search Defender for Cloud from the Azure Portal (portal.azure.com)
  •  From Defender for Cloud’s menu, click on Environment settings from the left bar.
  • Click on the subscription the resource is in.
  • In the top bar, click on Settings & Monitoring.
  • Turn on (if it’s not already enabled) the vulnerability assessment for machines and select the solution you wish to use. I’ll enable Microsoft Defender vulnerability management.

Once you are done, wait for the check to be triggered again. The alert should go away automatically after 24 hours.

Sources

https://learn.microsoft.com/en-us/azure/defender-for-cloud/auto-deploy-vulnerability-assessment