The ‘Report Suspicious Activity‘ feature is a part of the authentication methods settings in Entra ID. This feature allows users to report suspicious MFA requests when using the Microsoft Authenticator or phone calls (if you can, please migrate to something other than phone-based MFA methods). When a user reports an MFA request, the user risk will be bumped up. Depending on your Identity protection policies or Conditional Access Policies, the user might be blocked or prompted for a password change.
How to enable
To enable this feature, sign in to the Microsoft Entra admin center.
Head into Security, Authentication methods, Settings.
Under Report suspicious activity, select state, and set it to Enabled, then save.
If you want, you can scope who can use this feature using the Select group menu. You should usually apply the feature to all users.
User perspective:
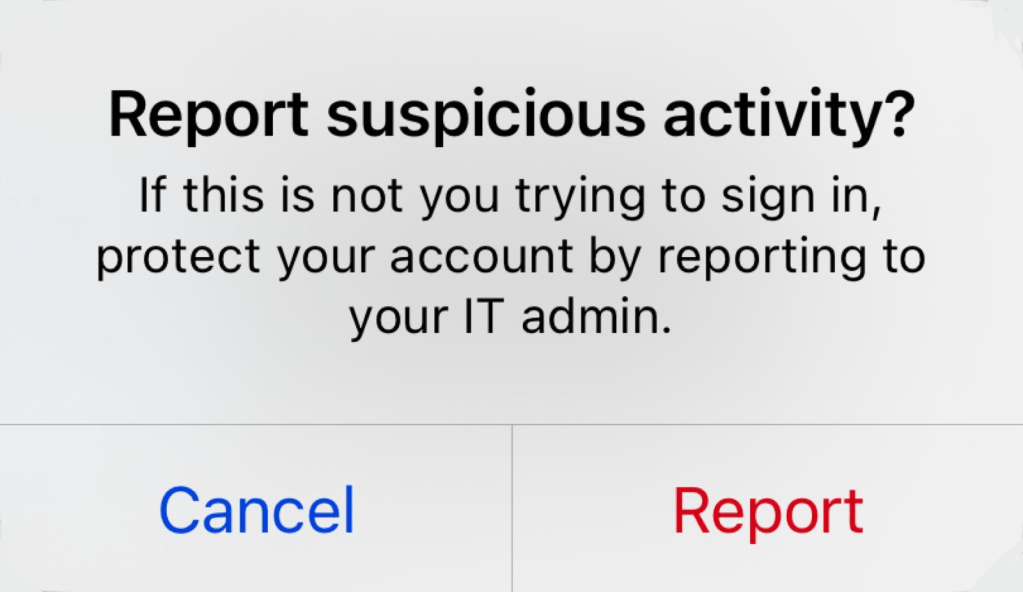
Once a suspicious MFA request is sent to the user, they should click “No, it’s not me.”
The user will be shown a new pop-up. The user should click “Report“.
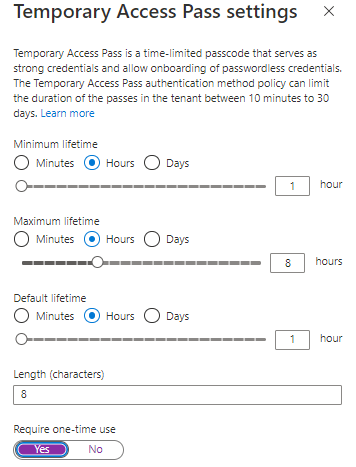
Temporary Access Pass is a time-limited passcode that allows users to register passwordless methods or recover access to their accounts without knowing their password. It is enabled via an authentication method policy that you can configure in Azure Active Directory. Apart from being time-limited, the TAP can also be configured for one-time use only. This can either be configured on the authentication methods policy so that every TAP created will be one time only (not the best idea at the moment) or at the creation of the TAP on the user authentication methods page.
The issue
The “Temporary Access Pass sign in was blocked due to User Credential Policy” issue is caused by the fact that the user has already used the TAP, and it was configured not to be valid for a second login. To fix this, modify the policy and allow for multi-use TAPs (if it’s not already enabled) then issue a new TAP.
While it makes sense from a general prospective to enable it for one-time use only at the policy level, this is usually impractical. For example, if you are using Autopilot, you’ll be requested to enter your credentials twice before configuring Windows Hello for Business. The first time, you’ll be asked for it at the enrollment phase, and the second time when logging into the user account for the first time. A one-time use TAP policy will create issues in this case. It’s also very common for users to mistakenly log off before configuring a passwordless method. If they do, you’ll need to issue a second TAP. For these reasons, it makes sense to allow a stricter lifetime but allow it to be used multiple times in that timeframe.
Conditional Access Policies (CAPs) are identity-driven policies that govern user access to resources based on certain conditions. We can summarize them as if statements that govern what will be requested, enforced or blocked. As identity has become a key focus for security efforts, it’s essential to manage it in the best way possible.
All policies “think” at the user level and are enforced after a user has completed the first form of authentication, such as entering their username and password. As such, an attacker could understand if the credentials are correct even if there are blocks dictated by CAPs that might block access based on various signals.
Conditional access policies are implemented using Azure Active Directory, which is the cloud-based identity and access management service that is part of Microsoft 365. As of right now, Azure Active Directory (or Azure AD for short) is being integrated into the newly created Entra product family.
It’s important to note that Conditional Access Policies will manage not only native Microsoft apps such as SharePoint, Teams, the Azure Portal, etc. but also all SaaS applications connected to Azure AD and all on-premises applications managed through Azure AD Application Proxy.
This can simplify the management of identities, as, for example, the user will have their MFA methods set in Azure AD, and they’ll be requested on all connected apps in Azure AD for which you have set Azure AD as the identity provider.
In most organizations, the CAPs enforce requirements such as the enforcement of MFA, the block of logins using legacy protocols and requiring a compliant device to access company resources.
It is advisable to create or make changes to CAPs only if you have a basic understatement of the service and always operate with caution since you could risk blocking access to the tenant for all users.
Please consider implementing an emergency administrator before starting with Conditional Access, and exclude it from all the policies. Read more regarding this here:
All Conditional Access policies must grant a user access before they can access a cloud app. If one of the CAP blocks the sign-in, the request will be denied. Note that if in the same policy you both include and exclude a user, the user will be excluded.
I wrote a post on how to check which policy is blocking a user sign-in. If you are curious, you can check it out here:
If you are creating a new policy, it can be set to “Report-only” mode first. This will allow you to use insights and reporting workbooks to evaluate the impact of the policy before you go on to apply it to everyone in the organization by turning it “On”. Alternatively, you can keep the policy inactive by setting it to “Off”. Please note that a certificate request might pop up on Macs or mobile devices if you require a check for Intune compliance in the policy, even if it’s in report mode.
Licenses and Security Defaults
As Conditional Access Policies require Azure Active Directory Premium P1, only some organizations are going to be able to use them. If you are not licensed for it, you use Security Defaults to establish a basic security baseline for your tenant. Security Defaults are now activated by default in all the newly created tenants. What Security Defaults will do is:
Requiring every user to register for MFA. Once enabled, users will have 14 days to register before being required to do so.
Requesting MFA for both standard users and administrators, especially when a user accesses privileged portals.
Block legacy authentication protocols which can’t support MFA.
Templates and JSON
There is currently a set of recommended policies that you can deploy right away by clicking on “New policy from template” at the following link:
While the templates are a very quick and easy way to start with CAPs, please exercise extreme caution. Even though they are created in report-only, they will not, for example, create a break glass admin and exclude it by default. If you mess up, you might end up locked out. Also note that it’s best to exclude users from CAPs using groups so that you don’t have to modify the policies constantly, which might end up in errors.
A cool new feature is the ability to implement CAPs using JSONtemplates. You’ll be able to export the policies you have created and be able to import them back in case anything happens.
To learn more, refer to the following documentation:
SMS-based authentication allows users to log in without needing to remember their username and password. After enabling the feature for an account, users can enter their phone number at the login prompt instead of their username. They will then receive an authentication code via text message that they can use to complete the login.
This service is often mistaken for SMS-based Multi-factor Authentication, but they are not the same.
This authentication method makes it easier for frontline workers to access applications and services. It’s not recommended to enable this feature for users who could use other passwordless methods or a combination of credentials + MFA. It’s also important to note that the desktop Office apps do not support SMS-based auth. Therefore, you can only use the web app version of the apps and only by logging in via office.com. You also cannot use the mobile version of the apps, except for Teams, Company Portal and Microsoft Azure.
If you decide to enable the feature, you should consider limiting and standardizing the frontline worker’s permissions to what’s necessary.
If you are curious why you should prioritize other methods over phone-based auth, consider reading this always relevant article by Alex Weinert:
Click on SMS (Preview). The feature is not in preview anymore, even if the portal states so at the moment of writing this guide.
Click on “Yes” under “Enable”, then “Select groups”, and select the group you created in the first step. Complete the step by clicking “Select” and “Save”.
To set a phone number, go into All Users | Azure AD, then select a member of the group you created in the first step.
Go into “Authentication methods”, then click “Add authentication method”. From there, select “Phone number” and insert the phone number the user will use to sign in, then click “Add”.
You can also add an authentication method via PowerShell:
# Replace the variables with the user you wish to add the auth method to and phone number you wish to assign

$User = "user@example.com"
$PhoneNumber = "+1 111111111"

Install-module Microsoft.Graph.Identity.Signins
Connect-MgGraph -Scopes UserAuthenticationMethod.ReadWrite.All
Select-MgProfile -Name beta

New-MgUserAuthenticationPhoneMethod -UserId $User -phoneType "mobile" -phoneNumber $PhoneNumber

# Get the phone number of the user

Get-MgUserAuthenticationPhoneMethod -UserId $User
If you need to script this for multiple users, you can refer to the code below.
This script assumes you created a CSV file in “C:\” named contacts.csv, and that the CSV file has a column named UserName and a column named PhoneNumber. If your CSV file has different column names, you will need to update the script accordingly.
# Install the modules and login to Graph

Install-module Microsoft.Graph.Identity.Signins
Connect-MgGraph -Scopes UserAuthenticationMethod.ReadWrite.All
Select-MgProfile -Name beta

# Import the CSV file containing names and phone numbers

$contacts = Import-Csv -Path "C:\contacts.csv"

# Loop through each user and add their phone number for authentication
# If you changed the column names, replace these placeholders with the actual column names from the CSV file


foreach ($contact in $contacts)
{
    $User = $contact.UserName
    $PhoneNumber = $contact.PhoneNumber
    New-MgUserAuthenticationPhoneMethod -UserId $User -phoneType "mobile" -phoneNumber $PhoneNumber
}
Conditional Access Policies (CAPs) are identity-driven policies that govern user access to resources. We can summarize them as if statements that govern what will be requested, enforced or blocked.
In most organizations, the CAPs govern the enforcement of MFA, the block of logins using legacy protocols, and requiring a compliant device to access company resources.
All policies “think” at the user level.
It is advisable to make changes to CAPs only if you have a basic understatement of the service, since you could risk blocking access to the tenant for all users. In order to learn more, refer to the following documentation:
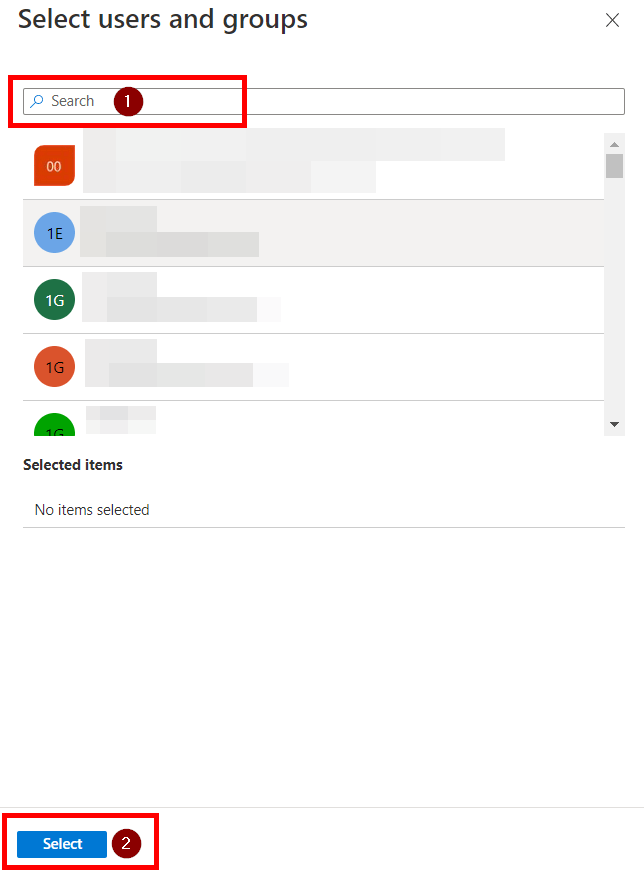
If you intend to add a user to the policy, click on the blue link under “Users or workload identities”, then “Include,” and click the blue link under “Users and groups”.
Select or search for the desired user, then click “Select.”
If you want to exclude a user, click on the blue link under “Users or workload identities”, then “Exclude,” and click on the blue link just below “Users and groups.” The same user selection screen shown in the previous step will open. Search for and select the user, then click “Select.”
Once done, save using the “Save” button at the end of the page. If the policy is in “Report-only” or “Off“, the flow is not active.
The following script will get all the members of an Azure AD group and add them to another group. You’ll just need to know the name of the two groups to make it work.
In the code shown below, the source group will be called Group1Name and the destination one Group2Name.
# Replace Group1Name with the name of your source group and Group2Name with the name of the destination one. Everything else will be done automatically

$Group1 = "Group1Name"
$Group2 = "Group2Name"


$group1ObjectID = Get-AzureADGroup -Filter "Displayname eq '$group1'" | Select objectid -ExpandProperty ObjectID
$group2ObjectID = Get-AzureADGroup -Filter "Displayname eq '$group2'" | Select objectid -ExpandProperty ObjectID

$membersGroup1 = Get-AzureADGroupMember -ObjectId $group1ObjectID -All $true

foreach($member in $membersGroup1)
{
    $currentuser = Get-AzureADUser -ObjectId $member.ObjectId | select objectid
    Add-AzureADGroupMember -ObjectId $group2ObjectID -RefObjectId $currentuser.objectid

}
Get-AzureADGroupMember -ObjectId $group2ObjectID -All $true
Suppose you or a user reset a password, and one of the following errors comes up. In that case, it means that either you are using a guessable password or that somebody in your organization has enabled Password Protection in your environment, and you are using a banned word.
Unfortunately, your password contains a word, phrase or pattern that makes it easily guessable. Please try again with a different password.
“Unable to update the password. The value provided for the new password does not meet the length, complexity, or history requirements of the domain.”
If you are a user, please try a more complex password to circumvent the error. Substituting @ with A, 1 with I, and other widespread ways of changing up a common word will not be counted as “not including a common word”.
If you are an admin, please note the following about this feature. Users often create passwords that use common words based on personal interests or easily rememberable things (e.g. cities, sports teams, celebrities, months, etc.). These passwords are strongly vulnerable to dictionary-based attacks. Azure AD Password Protection, which works either in a “cloud-only” mode or can also synchronize to on-prem, provides a global and custom-banned password list. The global one is maintained directly by Microsoft; the custom one can be modified by the Microsoft 365 / Azure AD admins.
To remove a user profile in Azure Virtual Desktop, you must first be sure that the user is logged off. If you are unsure on how to do it, follow the guide below.
After you’ve checked this, you got two options based on the type of profile architecture you chose to implement.
If the profiles are stored locally, you can proceed to remove them as you’d do in standard W10 machine.
If you are using FSLogix, which is the recommended way to handle them, you can proceed to remove the user folder from the Azure File Share.
If you are unsure about which type of user profile solution you use, you can log in to a standard user account (preferably the one you wish to remove) and follow the guide below.
If you fall under the first option, log into the AVD instance/instances with an admin user account, open “Run“, then type netplwiz.exe and click enter. This will open the Advanced User Accounts Control Panel. From there, you’ll get a list of all the users. Next, click on the user profile you’d like to delete and click “Remove”. You’ll have to repeat this procedure for all the AVD hosts in your environment.
If you are running FSLogix, log into the Azure File Share hosting your profiles, then locate the user folder you wish to delete. Usually, the format is either %username%%sid% or “%sid%%username%, depending on whether you have added the FlipFlopProfileDirectoryName registry in the FSLogix configuration (FlipFlopDirectoryName | AVD). Once you have found it, open it, and delete the VHD/ VHDX stored inside, as per the screenshot below. After the VHD deletion has been completed, delete the user profile folder.
This error message results from the application of a Conditional Access Policy on your tenant that blocks users from accessing cloud resources using a non-compliant device. The compliance state of a device is evaluated by Intune. To check which compliance policies you have active in your environment, head to:
To resolve the issue, either fix the device’s compliance state or exclude the user from the Conditional Access Policy.
To fix the compliance state, head into All Devices | Intune, click on the impacted device, and then “Device Compliance“. From there, you can see which policy makes the device not compliant and which setting is “at fault”.
If you are looking to understand which Conditional Access Policy is blocking the user, check out this guide:
This issue is mainly present if you are trying to migrate from Exchange on-prem to Exchange Online and you’re not going with the hybrid route. The “double mailbox” way consists in having an online mailbox and a local one, and manually (or automatically using tools) migrating the content online.
The issue is that, if you are synchronizing your on-prem AD with Azure AD, you are most probably including your msExchMailboxGUID into the replicated fields. This attribute will tell Exchange Online not to create an online mailbox, as an on-prem one already exists.
Once you will have cleared this field from the online user, Exchange Online will be able to create another mailbox, populating the msExchMailboxGuid of the online user, leaving you with the possibility of exporting and importing data into your online mailbox.
Please note that this will also automatically clear the following attributes from the online user:
alias
legacyExchangeDN
msExchArchiveGuid
msExchArchiveName
msExchBlockedSendersHash
msExchElcMailboxFlags
msExchRecipientDisplayType
msExchRecipientTypeDetails
msExchSafeRecipientsHash
msExchSafeSendersHash
userCertificate
To proceed with the creation of the online mailbox, follow these steps:
Open your AD Connect server.
Stop the Sync with Powershell (launch it as admin and keep it open after this command): Set-ADSyncScheduler -SyncCycleEnabled $false
Open the Synchronization Rules Editor as an admin.
Select the In from AD – User Exchange rule, click Edit, then click on yes.
Under Precedence write 250 (or the first free one), then click Next until you arrive in the Transformations page. Here look for msExchMailboxGuid, then change the row’s settings to make them match with the image below:
Once you are done, click Save, then open the original rule. Note down the Precedence (usually it’s 108), then delete the rule. Go into your newly cloned rule and change the Precedence to the one you noted down.
Before you enable the scheduler and perform a full sync, you should test out the changes. This is the documentation link to test everything out without committing changes to Azure AD: Verify changes to AD Connect rules | MS Docs
Reenable the scheduler: Set-ADSyncScheduler -SyncCycleEnabled $true
Perform a full synchronization: Start-ADSyncSyncCycle -PolicyType Initial
You should now be able to create a second mailbox for your synchronized user by assigning a valid license.
In this article I want to illustrate how I would notify my users of the upcoming activation of Additional Context and Number Matching in their MFA requests.
If you are looking for a guide on how to enable Additional Context and Number Matching, follow the guide linked below.
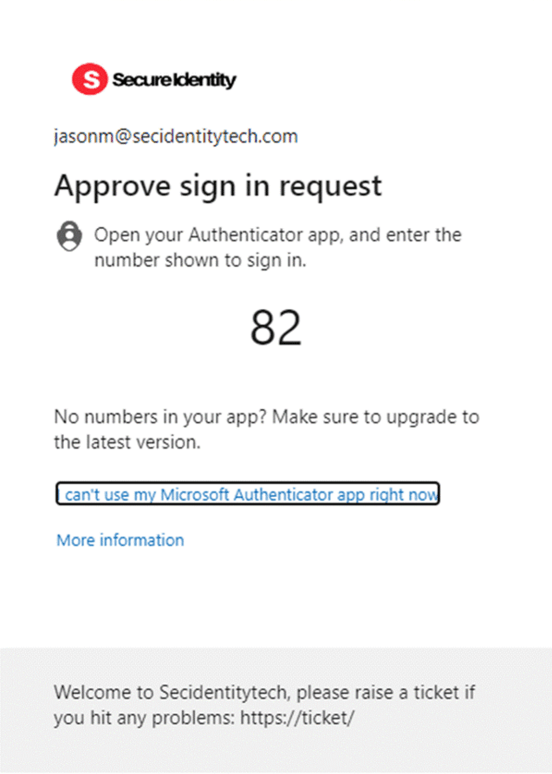
From [replace with activation date] forward, you will be asked to enter additional details in your MFA (Multi-factor authentication) prompts.
On your PC screen, you will be presented with a number, and you will be asked to enter this same number inside of your MFA request on your phone to complete the approval.
You will also get a map that will show the location where the request was made from. This must be taken as a general indication and it’s not always going to be your exact location, since Internet providers are not bound to route your connection from a point closest to you.
Please deny and report immediately to the IT department if you receive a request that was not done by you, or you do not recognize the location you are being shown.
If a user can’t access your tenant and forwards the following message to you, here are the steps on how you can solve it.
Your account is blocked
We’ve detected suspicious activity on your account.
Sorry, the organization you are trying to access restricts at-risk users. Please contact your admin.
The unblock is done by either resetting the user password or clearing the user risk once you have assessed that the risk is resolved.
If you have AAD Premium P2 (you can check it on the overview page of Azure AD), remediate the user risk by following this link Identity Protection | Risky users. A password reset is usually suggested and will also clear the user’s risk.
If you do not have AAD Premium P2, you can reset the user’s password or let them do it by themselves by using Self Service Password Reset (SSPR) if you have configured it. Alternatively, you can also go on this page, and ignore the user risk, once you have assessed that everything is resolved: AAD Risky Users. All these methods will clear the user risk.
Allow 10 – 15 minutes before the user can access again without getting the error reported above.
If you have Conditional Access Policies in place to block certain log-ins, you might get that a user will contact you because their sign-in request is being blocked. Probably both you and the user don’t know which policy is making the log-in fail, since it’s not specified in the error message.
The usual error message is something along the lines of: “Your sign-in was successful, but does not meet the criteria to access this resource. For example, you might be signing in from a browser, app or location that is restricted by your admin.” and the standard error code is “BlockedByConditionalAccess” error 53003
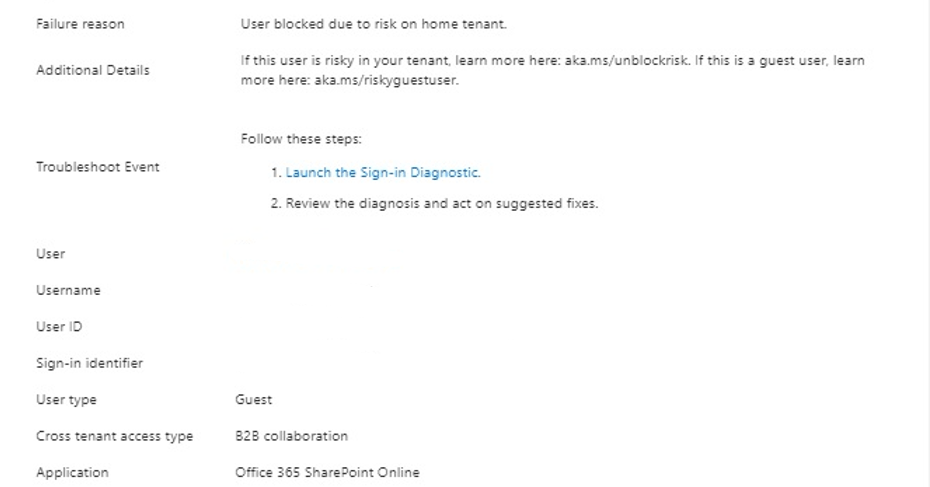
If you just enabled Azure AD Identity Protection for your entire tenant, you might get some complaints from guest users, saying that their sign-in was blocked.
If you got a similar issue, but the user is not a guest but a member of your organization, follow this guide:
You cannot remediate the user risk of a guest. If you try to look for a guest user in Identity Protection | Risky users, you won’t find any.
The user risk is calculated in the “home” tenant, where your user was created, not in the tenant you have guest access / are trying to access. This is also done so that the system may have more insights into user behaviour to calculate the risk.
How to resolve
Now going forward, there are two ways of solving this issue:
If the home tenant administrators have AAD Premium P2, they can remediate the user risk by following this link Identity Protection | Risky users. A password reset is usually suggested and will also clear the user’s risk.
If they do not have AAD Premium P2, they can reset the user’s password or let the user do it by themselves by using Self Service Password Reset (SSPR), if configured. Alternatively, they can also go on this page, and ignore the user risk, once you have assessed that everything is resolved: AAD Risky Users. All these methods will clear the user risk.
Of course, if you wish, you may disable the user risk policy for guests. This is done by creating a dynamic group in Azure AD containing all the guest (Dynamic security group with a dynamic query of usertype equals guest) and excluding it from the policy.