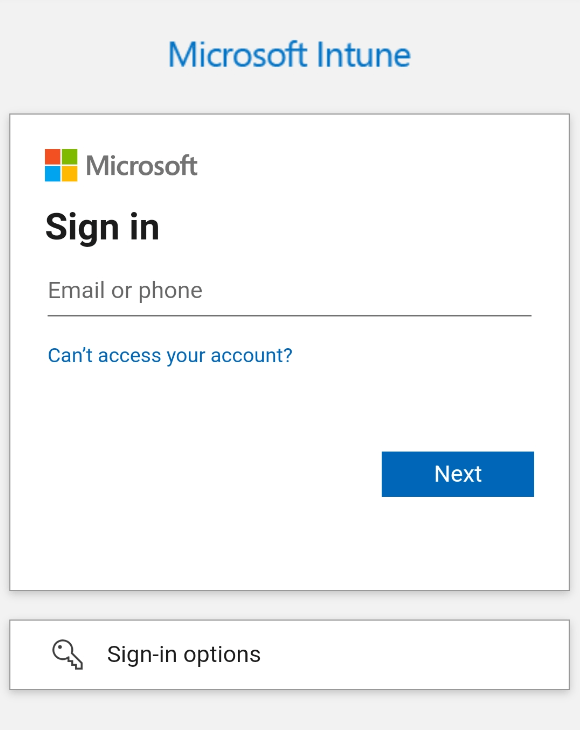
If you have got a passwordless admin account and then tried to connect to the SharePoint Online Management Shell (Connect-SPOService -Url https://yourtenant-admin.sharepoint.com) you’ve probably met an issue. The login prompt pops up, but it’s the old one, and you cannot use passkeys. It supports just the classic “password + MFA”.
Instead of the embedded browser, this tells the module to open your system’s default browser (Edge, Chrome, whatever you’ve got) where your FIDO2 key, Windows Hello, or Authenticator passkey works exactly as it does everywhere else.
Note: Make sure you are running the latest version of the SharePoint Online Management Shell. You can update it with:
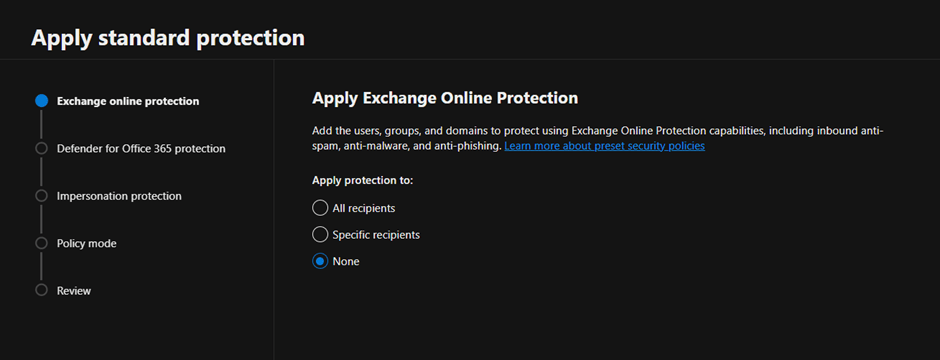
On a customer implementation I found the following error while trying to configure the Microsoft Baselines for Defender for Office 365:
The follow policies named “Standard Recommended Policy” or “Strict Recommended Policy” already exists. Please remove it first. HostedContentFilterPolicy
Guide
To fix the issue first open PowerShell and connect to Exchange Online. If you don’t have the module installed launch the following commands:
If you already have a Standard Preset Security Policy run the following to remove it:
Get-HostedContentFilterPolicy | Where Name -eq "Standard Preset Security Policy" | Remove-HostedContentFilterPolicy
If you already have a Strict Preset Security Policy run the following to remove it:
Get-HostedContentFilterPolicy | Where Name -eq "Strict Preset Security Policy" | Remove-HostedContentFilterPolicy
This should fix the issue. When you refresh your browser you should be able to configure the Preset Policies. Once completed, the new policies will show up.
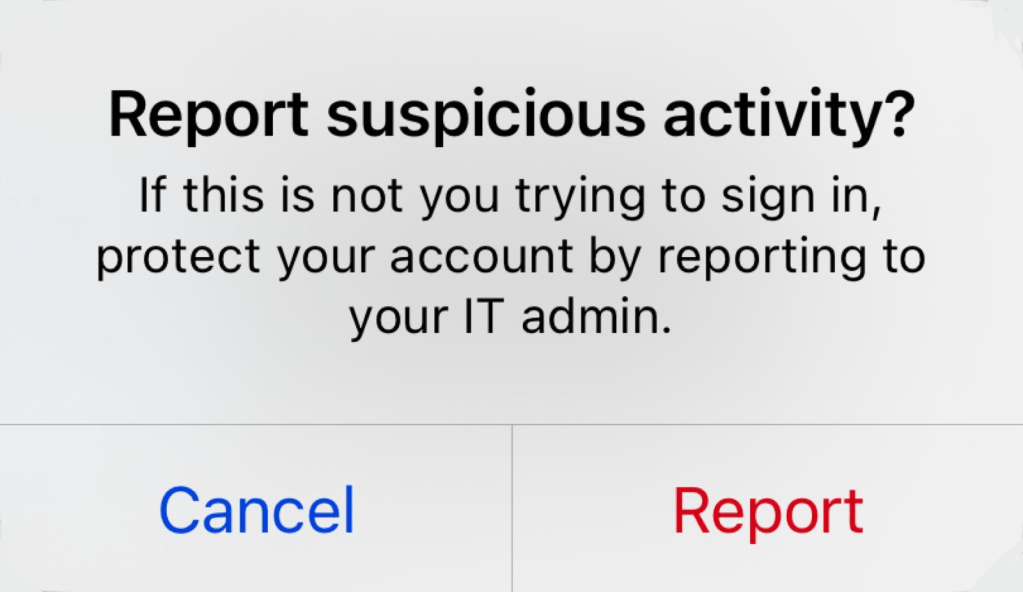
The ‘Report Suspicious Activity‘ feature is a part of the authentication methods settings in Entra ID. This feature allows users to report suspicious MFA requests when using the Microsoft Authenticator or phone calls (if you can, please migrate to something other than phone-based MFA methods). When a user reports an MFA request, the user risk will be bumped up. Depending on your Identity protection policies or Conditional Access Policies, the user might be blocked or prompted for a password change.
How to enable
To enable this feature, sign in to the Microsoft Entra admin center.
Head into Security, Authentication methods, Settings.
Under Report suspicious activity, select state, and set it to Enabled, then save.
If you want, you can scope who can use this feature using the Select group menu. You should usually apply the feature to all users.
User perspective:
Once a suspicious MFA request is sent to the user, they should click “No, it’s not me.”
The user will be shown a new pop-up. The user should click “Report“.
AuditBypassEnabled is a parameter present in the Get-MailboxAuditBypassAssociation and Set-MailboxAuditBypassAssociation, present in both Exchange and Exchange Online. When it’s set to true, it configures a mailbox logging to be bypassed, leaving no log of this user accessing its mailbox or any other mailbox it has access to.
While this might have made sense in some cases in an Exchange on-premises environment, in Exchange Online it’s mostly only a risk and I’m yet to see any real use case for it. Even if you log an application accessing its mailbox, this should not cause any issues to the system. While these types of logs might not be frequently accessed, it’s always better to have them.
How to audit
To check if any mailboxes in your environment are enabled for AuditBypassEnabled, you can use this script. Only issue is, it’ll output the name of the mailbox.
# Connect to Exchange Online
Connect-ExchangeOnline -UserPrincipalName "YOUR UPN HERE"

# Get all mailboxes with AuditBypassEnabled set to true
Get-MailboxAuditBypassAssociation -ResultSize unlimited | where {$_.AuditBypassEnabled -eq $true} | Format-Table Name,AuditBypassEnabled
If you prefer to get the primary SMTP address for the mailboxes configured with AuditBypassEnabled set to true, you’ll have to cycle through all the mailboxes:
# Connect to Exchange Online
Connect-ExchangeOnline -UserPrincipalName "YOUR UPN HERE"

# Get all mailboxes
$mailboxes = Get-Mailbox -ResultSize Unlimited

# Get all mailboxes with AuditBypassEnabled set to true
foreach ($mailbox in $mailboxes) {
    $auditBypass = Get-MailboxAuditBypassAssociation -Identity $mailbox.Identity
     if ($auditBypass.AuditBypassEnabled -eq $true) {
        Write-Output ("Mailbox: " + $mailbox.PrimarySmtpAddress + ", AuditBypassEnabled: " + $auditBypass.AuditBypassEnabled)
    }
}
How to disable
To disable AuditBypassEnabled for all the mailboxes, you’ll have to set AuditBypassEnabled to false. This script will do just that.
# Get all mailboxes with AuditBypassEnabled set to true
$mailboxesWithAuditBypass = Get-MailboxAuditBypassAssociation -ResultSize unlimited | where {$_.AuditBypassEnabled -eq $true}

# Loop through each mailbox and disable AuditBypass
foreach ($mailbox in $mailboxesWithAuditBypass ) {
    Set-MailboxAuditBypassAssociation -Identity $mailbox.Identity -AuditBypassEnabled $false

}
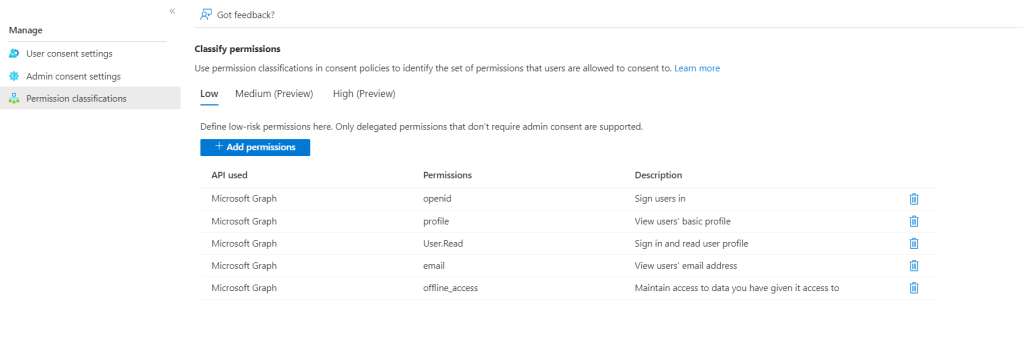
In Microsoft 365, users have the ability to consent to applications that interact with their data. However, attackers have taken advantage of this by tricking users into granting access to their data. To prevent this, in Entra ID administrators can configure which apps users can consent to and which require administrator review.
There are three options for managing user consent:
Do not allow user consent.
Allow user consent for apps from verified publishers for selected permissions.
Allow user consent for all apps.
I suggest against the latter (the default value for new tenants) as it leaves the organization vulnerable to phishing attempts.
The second one, allowing user consent for apps from verified publishers for selected permissions, is viable, but the permissions classification is crucial. It determines which permissions are considered low impact and can be consented to by users. You should be very conservative about which permissions are granted freely.
If users are blocked from approving apps, how will users request approval for such apps? Microsoft provides admin consent requests. It allows users to request approval for an application through a workflow rather than being blocked directly.
The choice between letting users approve verified apps and blocking user consent (but enabling consent workflows to preserve productivity) comes down to your organization’s size and security strategy. If in doubt, and if there isn’t any company strategy regarding this, I mostly suggest “Do not allow user consent”. This, combined with approval workflows, will add a bit of overhead, but it’s very manageable in most small to medium-sized tenants.
Remember, after you block (or only allow approved apps) consent, applications that were previously approved will still be allowed to access your org data. The next step is usually to conduct a rigorous analysis of formerly approved apps.
In Entra ID, administrators can also delegate app control to group owners for data related to their group, such as Teams content, allowing them to consent to applications for members of their group. Again, in this field, I’m mostly against allowing group owner consent if there isn’t a clear strategy for managing apps.
Under User consent for applications, depending on your organization, select either Do not allow user consent or Allow user consent for apps from verified publishers, for selected permissions. If in doubt, and if there isn’t any company strategy regarding this, I suggest “Do not allow user consent.
Under Group owner consent for apps accessing data, click Do not allow group owner consent.
Now, head into Admin consent settings from the menu on the left. Here, we’ll enable users to request application approval and who can approve them.
Enable “Users can request admin consent to apps they are unable to consent to“
I usually configure a limited number of admins, add them as members of a group, and add the group under the Groups tab. If you add a non-privileged user to this group, the user will get notifications for app approvals and will be able to deny the requests but not approve them, as this requires higher permissions.
Enable email notifications for requests and enable reminders.
Configure Consent requests as appropriate. In most cases, leaving 30 days is the optimal choice.
Save
If you have selected earlier Allow user consent for apps from verified publishers, for selected permissions, under “Permission classifications” on the left, you’ll be able to customize permissions that users can approve without admin requests.
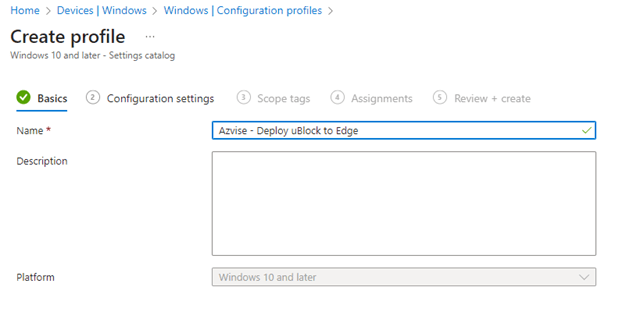
In March, I wrote about managing Chrome extensions in Intune. I wanted to touch briefly on Edge, focusing on silently installing uBlock Origin on clients.
uBlock Origin is one of the best “ad content blockers” we have and the one I use the most. It’s also one of the important things that should be deployed when you manage an environment. Today, we’ll see how to install it silently on Edge.
If you already have a policy with your Edge settings, consider adding the setting below to the existing ones.
Under Platform, select Windows 10. Under profile type, select Settings catalog. This can also be done via Administrative templates if you prefer. The logic below remains the same.
Name the policy and create a description.
Click on Add settings, then search for Control which extensions are installed silently.
If you apply policies to computers, select the one I used. Otherwise, if you usually scope to users, select the second one.
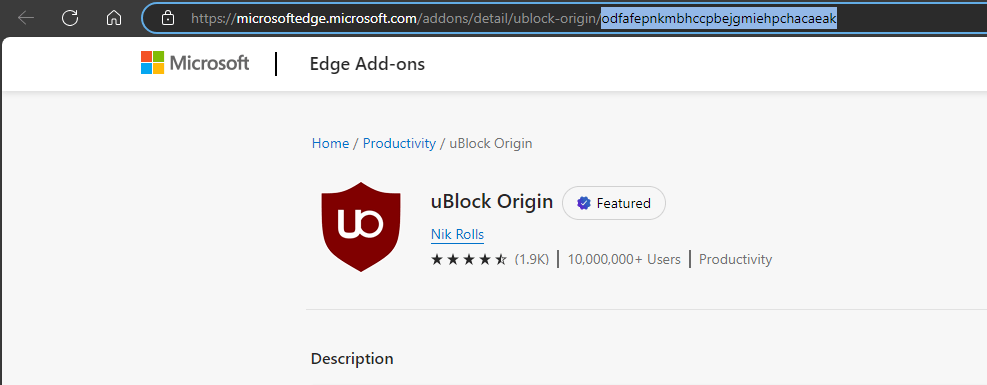
Now, we have to find the Extension ID. Open the Edge Add-ons store and search for uBlock Origin, or open the link below: uBlock Origin – Microsoft Edge Addons
The ID will be the last part of the URL that we found. In our case odfafepnkmbhccpbejgmiehpchacaeak
Add it to the Extension ID list
Now click Next, then assign Scope tags if you are using them, then click Next.
Assign the policy to the computers or users of your organization. What you choose will be based on whether you decided for Control which extensions are installed silently (computers), or Control which extensions are installed silently (User) (users). As always, I’d strongly recommend testing changes before deploying policies to the organization.
Once you are done, click Next, then Create.
If the users use multiple profiles, the extension will be active for all of them.
The users will not be able to remove the extension.
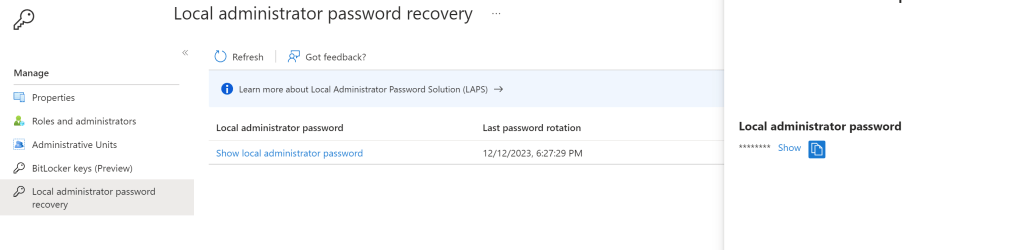
Every device is born with a local administrator password. How we manage its lifecycle will change a lot in our environment. Recently, Microsoft released support for LAPS integrated with Entra ID. While historically, we could use LAPS with AD, we now have the option to manage our local admin passwords directly in the cloud for hybrid and Entra ID joined devices.
To read the local administrator password, you must be granted the following action:
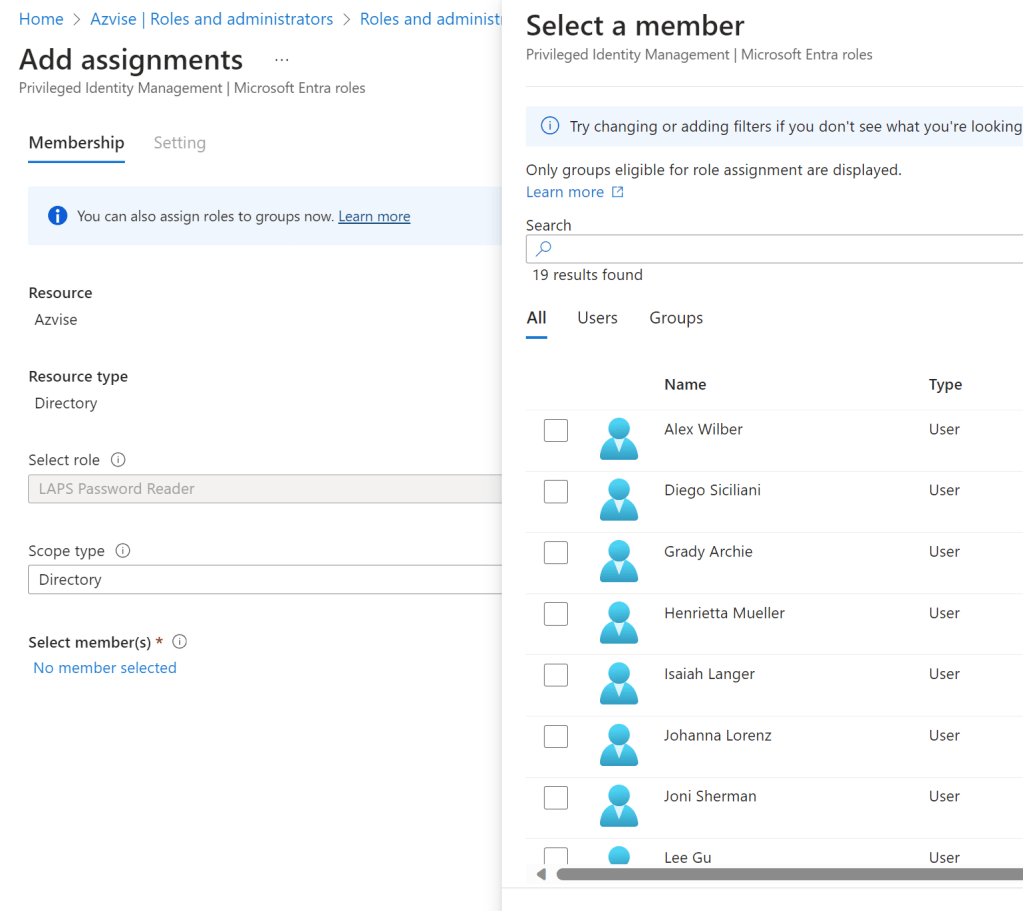
All other default roles are not eligible for reading LAPS passwords. So, we’re going to create a custom role to enable “lower privileged” admins to get them.
Assign people to the role, preferably via eligible assignments.
Click on Add Assignments, then on “No members selected”
Select the users or groups you wish to assign the role to, then click “Select” and “Next“.
Select if the role has to be permanent or eligible. It’s always preferable to have eligible roles instead of active roles. Eligible means the user has to activate the role via PIM (Privileged Identity Management) before being assigned to the role. Once activated, the role is going to be active for a set amount of time. Active means the user is always going to have the role active for their user account.
Click on “Assign”.
Now, test everything. You should be able to read the LAPS passwords.
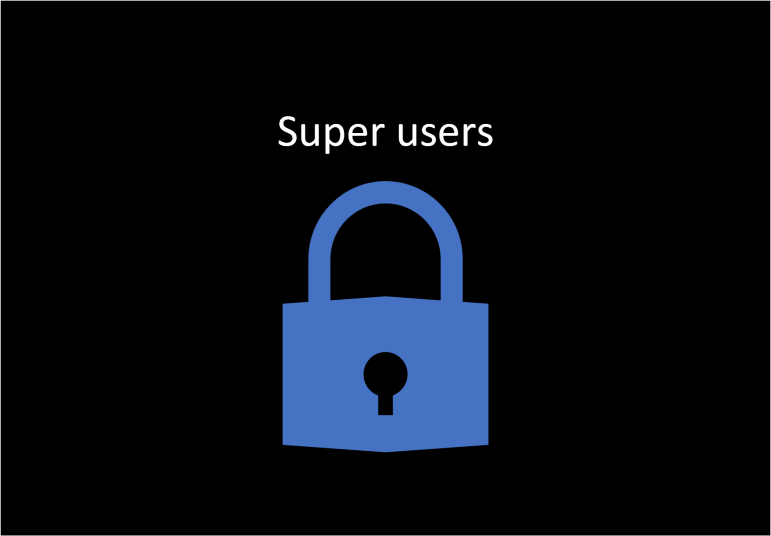
Azure Information Protection has a feature known as “super user”. This feature enables an account (or group members) to fully manage protected documents, including removing encryption, no matter the permissions configured on the single label. This feature is mainly used by auditing teams for reviews and by admins when setting up the AIP Scanner service account. The configuration of the super users can only be done via PowerShell. While you can have multiple users assigned to this feature, only a group at a time can be configured. The members of this feature should be monitored regularly, as this is a critical role. To audit members of the feature, refer to the following resources:
Microsoft Entra ID allows granting users just-in-time membership in groups with Privileged Identity Management (PIM). This is particularly useful, as you may want to only assign temporary membership to the eligible group members assigned to the super user feature. Please note that you’ll need Entra ID Plan 2 to use PIM.
Requirements
You have to use a Global Administrator account to add users to this feature
To use PIM for Groups you’ll need Entra ID Plan 2
Enable the feature and add a single user
Enabling the feature for a single user might be more convenient in urgent situations. If this is not the case, you’ll primarily refer to the group steps below.
# Install the Azure Information Protection module.
Install-module AIPservice
# Import the module
Import-module AIPservice
# Connect to Azure Information Protection.
Connect-AIPService
# Enable the Azure Information Protection super user feature since it's disabled by default.
Enable-AIPSuperUserFeature
# Check the activation status of the AIP super user feature
Get-AipServiceSuperUserFeature
# Add a user as a super user
Add-AipServiceSuperUser -EmailAddress "superuser@azvise.com"
# List the current super users
Get-AipServiceSuperUser
Enable the feature and add a group
If you enable PIM for this group, you can better audit who enabled their permissions and improve your general posture. Running this command overwrites the previous group assigned to the feature. If you already use the super user feature, please check before erasing the previous configuration.
# Install the Azure Information Protection module.
Install-module AIPservice
# Import the module
Import-module AIPservice
# Connect to Azure Information Protection.
Connect-AIPService
# Enable the Azure Information Protection super user feature since it's disabled by default.
Enable-AIPSuperUserFeature
# Check the activation status of the AIP super user feature
Get-AipServiceSuperUserFeature
# Add a group as a super user
Set-AipServiceSuperUserGroup -GroupEmailAddress "SUGroup@azvise.com"
# List the current super users group
Get-AipServiceSuperUserGroup
Remove users from the feature and deactivate it
If you wish to turn off the feature, note that any unremoved users and groups will still be listed as members even if the feature is disabled. When you enable the feature again, they’ll get their super user permissions back. To clean up, follow these steps:
# List the current super users
Get-AipServiceSuperUser
# List the current super users group
Get-AipServiceSuperUserGroup
# Clear the super user group
Clear-AipServiceSuperUserGroup
# Remove users from the feature
Remove-AipServiceSuperUser -EmailAddress "superuser@azvise.com"
# Disable the feature
Disable-AipServiceSuperUserFeature
# Check the activation status of the AIP super user feature
Get-AipServiceSuperUserFeature
Microsoft Tunnel is a VPN gateway for Microsoft Intune. It runs within a container environment on a Linux host and allows secure access to on-premises resources for Android and iOS devices.
When you configure Microsoft Tunnel, you’ll find in the official documentation the following phrase:
Configure multiple NICs per server (Optional): We recommend using two Network Interface controllers (NICs) per Linux server to improve performance, though use of two is optional.
Since I found no public reference to sample configurations, I wanted to share my Linux network configuration to save some time for others. For the networking part, because I’m using Ubuntu 22.04 for this demo, everything is managed by netplan.
For context, the two NICs we’ll configure will be one public facing and one in the internal network. The VM is hosted on a local hypervisor in my network.
Steps
First, get the name of your interfaces by running ip a or lshw -C network and note them down. In my lab, the two NICs are ens160 and ens192.
# Get the available NICs
lshw -C network
Then, we have to identify the default netplan file
# Move to the netplan folder
cd /etc/netplan
# Get the available config files
ls
In my case, the file was called /etc/netplan/50-cloud-init.yaml
# Edit the default config file using your favourite text editor. For this example, we'll use nano
nano /etc/netplan/50-cloud-init.yaml
Now paste the following inside the configuration after making the following changes:
Under ens160 -> addresses, replace X.X.X.X with your public IP address and /27 with your subnet mask
Under ens160 -> nameservers -> addresses, replace 1.1.1.1,8.8.8.8 with your nameservers
Under ens160 -> routes -> via, replace Y.Y.Y.Y with your gateway IP
Under ens192 -> addresses, replace 10.0.0.4 with your private IP address and /27 with your subnet mask
Under ens192 -> nameservers -> addresses, replace 1.1.1.1,8.8.8.8 with your nameservers
Under ens160 -> routes -> to, replace 192.168.1.0/24 with the on-prem network hosting your applications.
Under ens160 -> routes -> via, replace 10.0.0.1 with the gateway of the IP you configured under under ens192 -> addresses
This is the network config written by 'subiquity'
network:
  ethernets:
    ens160:
      dhcp4: no
      addresses: [X.X.X.X/27]
      nameservers:
        addresses: [1.1.1.1,8,.8.8.8]
      routes:
      - to: default
        via: Y.Y.Y.Y
    ens192:
      dhcp4: no
      addresses: [10.0.0.4/27]
      nameservers:
        addresses: [1.1.1.1,8,.8.8.8]
      routes:
      - to: 192.168.1.0/24
        via: 10.0.0.1
  version: 2
Then, run the following command to check that everything went well:
netplan generate
Apply the network config and check that the configuration was applied:
netplan apply
ip a
Finally, restart the Microsoft Tunnel, if already installed:
SharePoint can automatically apply sensitivity labels to a document library. New documents, both created online or uploaded and existing ones (when they are edited), will get the sensitivity label you chose.
If a document label gets manually modified, SharePoint won’t overwrite the label. This isn’t usually an issue because only a few selected number of employees should have the permissions to declassify a document.
This automation supports the following file formats:
Word: .docx, .docm
Excel: .xlsx, .xlsm, .xlsb
PowerPoint: .pptx, .ppsx
PDF (Preview)
Whilst the support for PDFs is still in preview, I still have yet to have issues with it.
This script was written because I found the steps to enable this feature a bit confusing, and so I wanted to simplify the process with a simple automation.
Before running the script, create and publish your sensitivity labels. You have to publish the label to the user setting the default sensitivity label.
After running the script, go into the labels and modify the scope to include groups and sites. You’ll have to wait a bit between running the PowerShell script and enabling groups and sites, as it’s greyed out by default.
After you have enabled groups & sites, you’ll have to wait for the setting to label a SharePoint library to show up.
To set the default label, go under SharePoint Admin Center, then Sites, Active Sites, and click on the site you wish to apply the sensitivity label to. Under Settings, you’ll find a Sensitivity label dropdown.
Modify the two variables before running the script.
# Define the variables for your enviroment. The first one is the link to your SharePoint Admin Portal. The second one is your administrator account User Principal Name

$SPAdminLink = "https://yourtenant-admin.sharepoint.com"
$AdminUPN = "youradminUPN@contoso.com"

# Connect to SPO. Replace the link with your SharePoint Admin portal

Connect-SPOService -Url $SPAdminLink

# Enable AIP Integration

Set-SPOTenant -EnableAIPIntegration $true
(Get-SPOTenant).EnableAIPIntegration

# Enable support for PDFs. Update SP Online Module if this fails. The link is https://www.microsoft.com/en-us/download/details.aspx?id=35588

Set-SPOTenant -EnableSensitivityLabelforPDF $true
(Get-SPOTenant).EnableSensitivityLabelforPDF

# Connect to AAD and enable support for labels in groups. Source: https://learn.microsoft.com/en-us/microsoft-365/compliance/sensitivity-labels-teams-groups-sites?view=o365-worldwide

Install-Module AzureADPreview
AzureADPreview\Connect-AzureAD

$grpUnifiedSetting = (Get-AzureADDirectorySetting | where -Property DisplayName -Value "Group.Unified" -EQ)
$Setting = $grpUnifiedSetting

# Check if EnableMIPLabels is enabled. If nothing is displayed then you have no group settings. We'll enable it.

$grpUnifiedSetting.Values

# Enable the feature. If it fails check out this guide: https://learn.microsoft.com/en-us/azure/active-directory/enterprise-users/groups-settings-cmdlets#create-settings-at-the-directory-level

$Setting["EnableMIPLabels"] = "True"

# Check that now it's enabled. If it's enabled you'll get
#
#Name                            Value
#----                            -----
#EnableMIPLabels                 True

$Setting.Values

# Save

Set-AzureADDirectorySetting -Id $grpUnifiedSetting.Id -DirectorySetting $Setting

# Now we'll import ExchangeOnlineManagement and then connect the Compliance Powershell to sync the labels

Import-Module ExchangeOnlineManagement
Connect-IPPSSession -UserPrincipalName $AdminUPN
Execute-AzureAdLabelSync
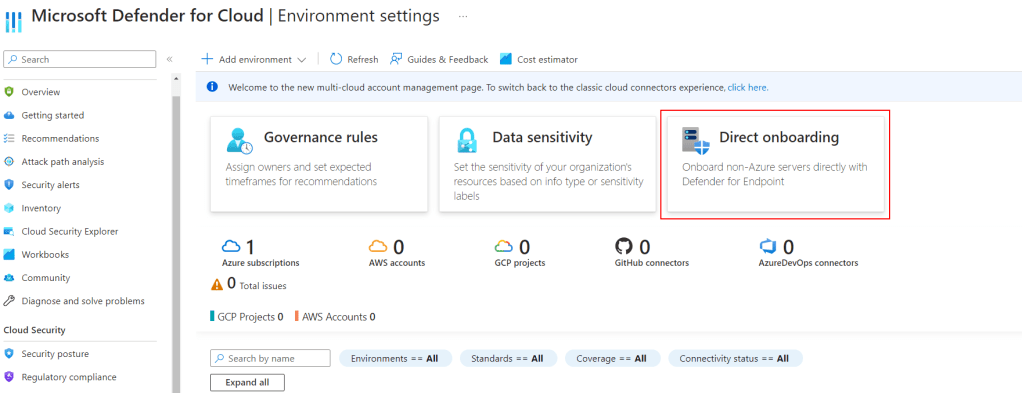
If you want to onboard on-prem servers directly to Defender for Servers, you can now do so with the Defender for Endpoint agent. This has the advantage of being able to license and activate Microsoft Defender for Endpoint on servers without having to use Azure Arc. While full of useful functionalities, Arc, among others, gives you remote management of your servers and must be therefore treated carefully.
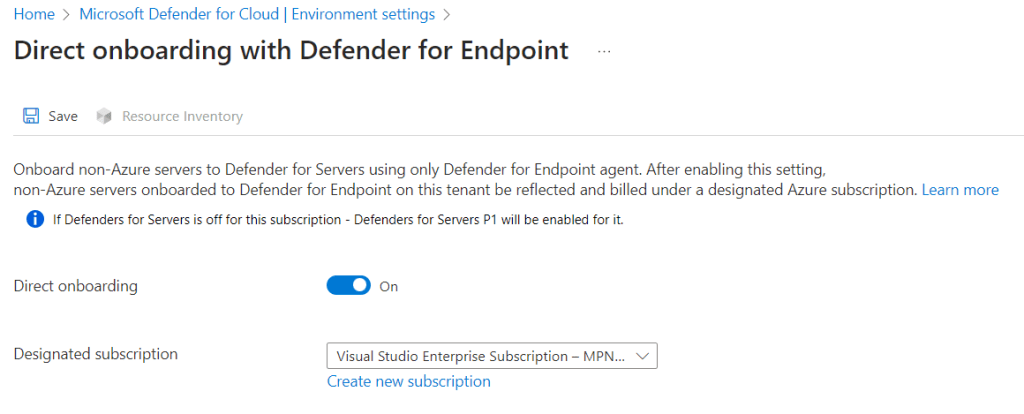
If you enable direct onboarding (a tenant-level feature) and onboard your servers to MDE, they’ll show up in Defender for Cloud and be enabled to Defender for Servers. Still, you’ll have to onboard your servers with Arc to get the most out of Defender for Servers, such as the features in Plan 2. Defender for Servers Plan 1 include the following functionalities:
“Direct onboarding is a seamless integration between Defender for Endpoint and Defender for Cloud that doesn’t require extra software deployment on your servers. Once enabled, it also shows your non-Azure server devices onboarded to Defender for Endpoint in Defender for Cloud
Select Direct Onboarding in the middle of the screen.
Set Direct onboarding to On and select the billing subscription. In this subscription you’ll get a “Servers – Defender for Endpoint” object which references the on-prem server enabled to Defender for Servers.
Save
Check if Direct onboarding enabled Defender for Servers Plan 1 on that subscription.
To check, go into Environment settings, select the subscription you have used for enabling Direct onboarding
From Defender plans, look for Servers, then make sure it’s enabled and Plan 1 is selected
Last month I had the wonderful opportunity to speak at two Italian conferences, for which I’m very grateful: Azure Day Rome and Global Azure Turin. In Turin, I talked about Passwordless with Riccardo Corna (Secure Modern IT | Riccardo Corna) and protecting administrative accounts in Rome. They both were excellent learning opportunities, but I also had the pleasure of meeting familiar faces and new community members. For future reference, I’ve decided to make my presentation slides available right here. Feel free to dive in and use the content for your presentations.
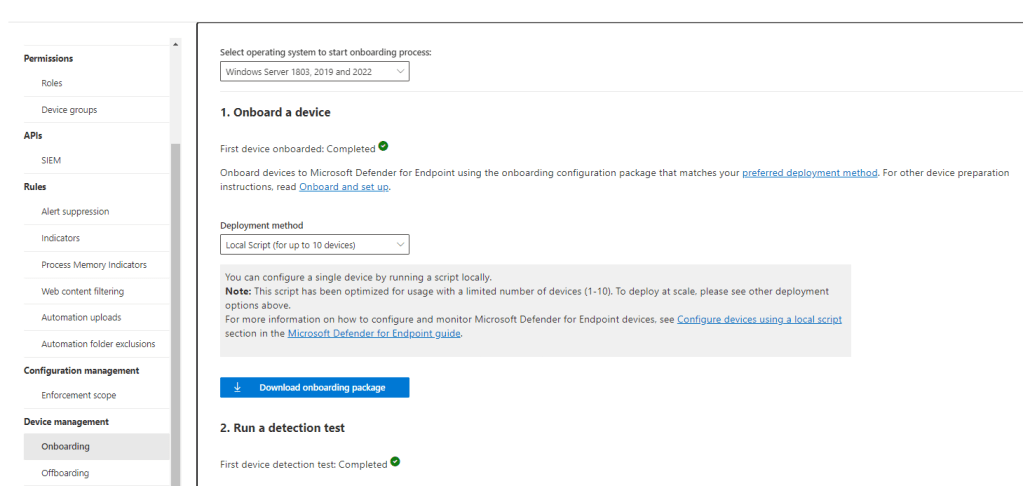
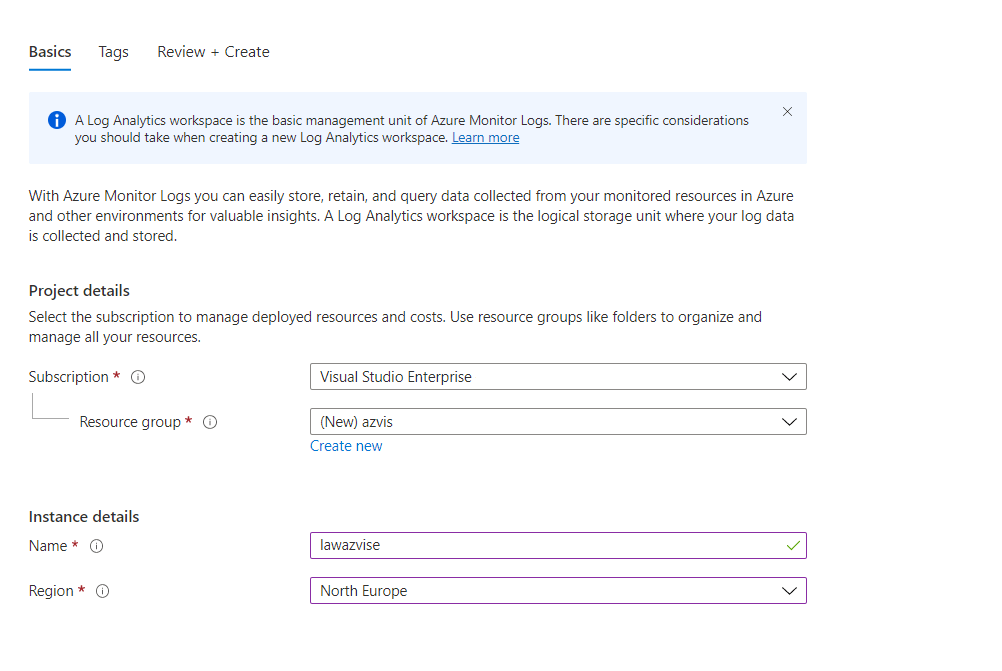
Exporting the logs from Azure AD is one of the crucial operations in setting up a tenant. In case something happens, along with the Unified Audit Logs (https://azvise.com/2021/10/26/office-365-enable-unified-audit-logs/), it gives you the possibility to go back in time, and better understand what’s going on. To export the Azure AD logs you’ll need an Azure AD Premium license and an Azure Subscription. You’ll also need to be a privileged admin (Global Admin or Security Administrator). You’ll mostly want to export the logs to a Log Analytics Workspace, because it gives you the possibility to comfortably query the data via the Kusto Query Language (KQL). If you are not familiar with it, I’d suggest Must Learn KQL by Rod Trent: https://github.com/rod-trent/MustLearnKQL
Select the subscription, resource group and choose a name and region for the LAW.
Click on “Review + Create”, then on “Create”.
Once the deployment has been completed, click on “Go to resource“.
From “Usage and estimated costs” then “Data retention“, you’ll be able to configure for how longs the logs will be kept. The default is 31 days, but you can go as high as 730. Once you are done customizing it click on Ok.
Go to Diagnostics Settings | Azure AD. If you prefer, head manually in the Entra portal, then in Monitoring & Health, then Diagnostic settings.
Click on “Add diagnostic setting”.
Select the types of logs to want to export. Ideally “SignInLogs” and “AuditLogs”
Select “Send to Log Analytics workspace”.
Select the Log Analytics Workspace you just created.
As I speak to more and more customers about the matter, I notice that a lot of companies have a questionable security posture regarding their administrative accounts. For example, many admins are using their “daily-runner” account as privileged administrators for their tenants, or synchronizing their domain admins to privileged roles in Azure AD. In general, a lot of admin accounts aren’t getting the care they deserve.
Losing privileged access is a big deal and it’s happening more and more often. Clearly, attackers love targeting privileged accounts because they give them quick and broad access to a company’s important assets, leaving a lot of defences behind.
I decided to write this article to highlight some of the controls that should be implemented in our tenants to improve our admin accounts posture, as privileged access management should be one of our top security priorities. These points have been aggregated after a lot of discussions with colleagues and experts on the topic and with the help of best practices from Microsoft Docs.
The 10 tips list
As a best practice, administrator accounts should be:
Separate from your daily-runner account. Collaboration tasks should not be done from the administrative accounts. While it’s of course not convenient, admins should get used to handling multiple accounts for different permission levels.
Cloud-only. Your Azure AD administrator accounts should be different to your on-premises admins, and should not be synchronized from the on-premises Active Directory. This is because if one’s identity gets breached, the attackers would have easy access to both Azure AD and AD.
Mailbox-less. The easy way to implement this is by not assigning admins licenses. You should enable a forward from your admin account to your daily driver account, or a dedicated mailbox/distribution list assigned to an unprivileged user.
Using phishing-resistant authentication methods. FIDO2 keys should be your primary way of accessing your admin accounts. If FIDO2 keys or similar methods are unavailable to you, you should have at least MFA active on your account with number matching and additional details active. Ideally, you should also restrict access to your resources to only allow access from known devices.
Reviewed periodically. Periodically analyse the list of admins, and remove excessive permissions. There are a lot of cool tools that can help you out with this, or you can script your own. Microsoft suggests analysing these roles first, then moving to the other administrative accounts: Global Administrator, Privileged Role Administrator (they are a click away from being Global Admins), Exchange Administrator, and SharePoint Administrator. Remove guest admins where applicable.
Protected by IdentityProtection. Identity Protection automatically scans your sign-ins and blocks the user if anything strange is going on. You can also configure it to force the user to do a self-service password reset.
PIM-enabled. You should have administrative privileges only when you require them. Having admin privileges active on an account 24/7 without a specific reason is not the best idea. Moreover, whenever you enable your PIM roles, you get an email, to keep everything under control.
Backed up by one or two emergency accounts. If bad things happen, you should still be able to access your tenant. Emergency access administrators help you with that. You should also consider activating a rule to alert you when this admin gets used. Here is a cool guide to create passwordless emergency admins with FIDO2 Keys: https://janbakker.tech/break-glass-accounts-and-azure-ad-security-defaults/
Protected with Conditional Access Policies. This is a very broad topic, but make sure that at least the following apply. Those policies can be created quickly using Conditional Access policies templates: Require phishing-resistant multifactor authentication for admins, Securing security info registration, block legacy authentication, require multifactor authentication for Azure management, Require compliant or hybrid Azure AD joined device for admins, Block access for unknown or unsupported device platform, No persistent browser session. Of course, before activating this policies, be really careful to test things out and exclude the emergency account(s).
Additional points:
Use precise Administrative roles. Of course, using highly privileged accounts it’s convenient, as you have only to activate one role to manage everything. But if you assign people the correct permissions they need for their daily job, a lot of headaches can be prevented. Check out this documentation page to ease the pain of finding the right role to assign: https://learn.microsoft.com/en-us/azure/active-directory/roles/delegate-by-task
Consider Privileged Access Workstations. Having PAWs for Admin roles can help a lot with your security posture. PAWs can be configured on Azure AD with device filtering rules in Conditional Access Policies. For example the CAP may require: When all admins, except for the emergency access administrator, access all apps, block access unless they are using specified devices, filtered by device ID. These PAWs should be AAD joined, and are usually for Global Admins and Privileged Role Administrators. Also, having Bitlocker on at least this machines is a must. Spoofing device IDs with Powershell is sadly possible at the moment, but it’s kinda hard and not one of the first things that attackers will do. As always, a lot of this depends on your security risk acceptance level. If you want to drill down on PAWs, this article might be useful: https://learn.microsoft.com/en-us/security/privileged-access-workstations/privileged-access-devices
If you have an on-premises AD, you should really look into improving your AD security, as your AAD security and your AD security are tightly correlated. A tiering model for Active Directory is really useful to better manage your forests, and implementing Defender for Identity gives you a whole new level of analysis and reaction on what’s going on. This won’t be discussed here, but there are plenty of resources to get started with this. Also, again, don’t sync your on-prem administrators to Azure AD. You should have some level of filtering from on-prem to Azure AD, such as filtering by OU or by AD attributes.
Also not discussed here, as Azure permissions are a whole topic by themselves, but you should really be analyzing Azure privileged permissions and keeping everything under control.
This is one of the more common alerts that may come up when you activate Defender for Cloud. This message comes up when a vulnerability assessment solution is not found in at least one virtual machine in your environment.
What happens behind the curtains? Azure virtual machine servers are constantly checked for infrastructure security misconfigurations by Defender for Cloud, which offers advice on how to fix them. Through integrated Vulnerability Assessment solutions or via agents and extensions, Defender for Cloud can also report on vulnerabilities found and the OS or application level. Since these “agents” must be configured for the process to work, you should configure the automatic provisioning of vulnerability assessment solutions on your virtual machines.
A valid VA solution is one of the following:
Microsoft threat and vulnerability management, included in both the Defender for Servers plans (P1 and P2). This is now the suggested solution, especially if you already use Microsoft Defender for Endpoint. You should not confuse this with the Microsoft Defender Vulnerability Management Add-on, which has a really similar name but is a different feature included with Defender for Servers Plan 2.
The Qualys agent, also included in Defender for Servers, but just in Defender for Servers Plan 2. This used to be the default choice in the past.
As we said, Microsoft threat and vulnerability management is the default solution to fix this recommendation. The only case I would use something else is if you already have Qualys or Rapid 7 in your environment and want to manage everything from a single pane. Defender for Endpoint will be onboarded in the VM through the MDE.Windows extension.
Step-by-step guide
To automatically enable a vulnerability assessment solution and resolve the alert:
Search Defender for Cloud from the Azure Portal (portal.azure.com)
From Defender for Cloud’s menu, click on Environment settings from the left bar.
Click on the subscription the resource is in.
In the top bar, click on Settings & Monitoring.
Turn on (if it’s not already enabled) the vulnerability assessment for machines and select the solution you wish to use. I’ll enable Microsoft Defender vulnerability management.
In March 2022, Intune added support for Chrome Administrative Templates. This allows for further customization of your Chrome installation without needing the custom ADMX and the OMA-URIs.
This post will show how to configure the silent installation of an extension in Chrome using Administrative Templates. If you are using ADMX policies, consider switching to this or Settings Catalogs. If you are already leveraging Settings Catalogs, you should go that way and build this policies as settings catalogs.
Select Create Profile, then on platform click on Windows 10 and later.
The profile type will be Templates. Then select Administrative Templates.
Click on Create, then give the policy a name.
Under Computer Configuration, select Google, then select either Google Chrome or Google Chrome – Default settings. The first will not let users modify the policies; the second will give users freedom to change the settings you set. You’ll usually go with the first one.
Click Extensions, then select Configure the list of force-installed apps and extensions.
Once you have the policy open, you’ll need to set it to Enabled, then insert the Extension ID of the extension you want to provision. For this article, I’ll be using uBlock Origin, which I highly suggest, and has cjpalhdlnbpafiamejdnhcphjbkeiagm as ID.
If you want to retrieve the ID of an extension, head to the Chrome web store and search for the app you wish to install. From there, look at the address bar. The end of the URL is the ID you are looking for. Refer to the screenshot below. If you want to retrieve the ID of an extension, head to the Chrome web store, and search for the app you wish to install. From there, look at the address bar. The end of the URL is the ID you are looking for. In our example, the ID is cjpalhdlnbpafiamejdnhcphjbkeiagm, as shown in the picture below.
Sometimes the Chrome web store attaches a “?hl=XX” at the end of the URL, which references the host language. XX in this example can be something like it, de, or similar, depending on your host language. This is NOT part of the ID and should not be copied over to Intune.
Once you have pasted your IDs into the Intune policy, click Ok, then Next.
From there on, scope the policy as needed in the Assignments tab, click Next, and Create.
Microsoft’s description of the policy
Here is Microsoft’s description of the policy “Configure the list of force-installed apps and extensions”:
Setting the policy specifies a list of apps and extensions that install silently, without user interaction, and which users can’t uninstall or turn off. Permissions are granted implicitly, including for the enterprise.deviceAttributes and enterprise.platformKeys extension APIs. (These 2 APIs aren’t available to apps and extensions that aren’t force-installed.) Leaving the policy unset means no apps or extensions are autoinstalled, and users can uninstall any app or extension in Google Chrome. This policy superseeds ExtensionInstallBlocklist policy. If a previously force-installed app or extension is removed from this list, Google Chrome automatically uninstalls it. On Microsoft® Windows® instances, apps and extensions from outside the Chrome Web Store can only be forced installed if the instance is joined to a Microsoft® Active Directory® domain, running on Windows 10 Pro, or enrolled in Chrome Browser Cloud Management. On macOS instances, apps and extensions from outside the Chrome Web Store can only be force installed if the instance is managed via MDM, or joined to a domain via MCX. The source code of any extension may be altered by users through developer tools, potentially rendering the extension dysfunctional. If this is a concern, set the DeveloperToolsDisabled policy. Each list item of the policy is a string that contains an extension ID and, optionally, an “update” URL separated by a semicolon (;). The extension ID is the 32-letter string found, for example, on chrome://extensions when in Developer mode. If specified, the “update” URL should point to an Update Manifest XML document ( https://developer.chrome.com/extensions/autoupdate ). By default, the Chrome Web Store’s update URL is used. The “update” URL set in this policy is only used for the initial installation; subsequent updates of the extension use the update URL in the extension’s manifest. Note: This policy doesn’t apply to Incognito mode. Read about hosting extensions ( https://developer.chrome.com/extensions/hosting ). Example value: aaaaaaaaaaaaaaaaaaaaaaaaaaaaaaaa;https://clients2.google.com/service/update2/crx abcdefghijklmnopabcdefghijklmnop
Other useful extension settings
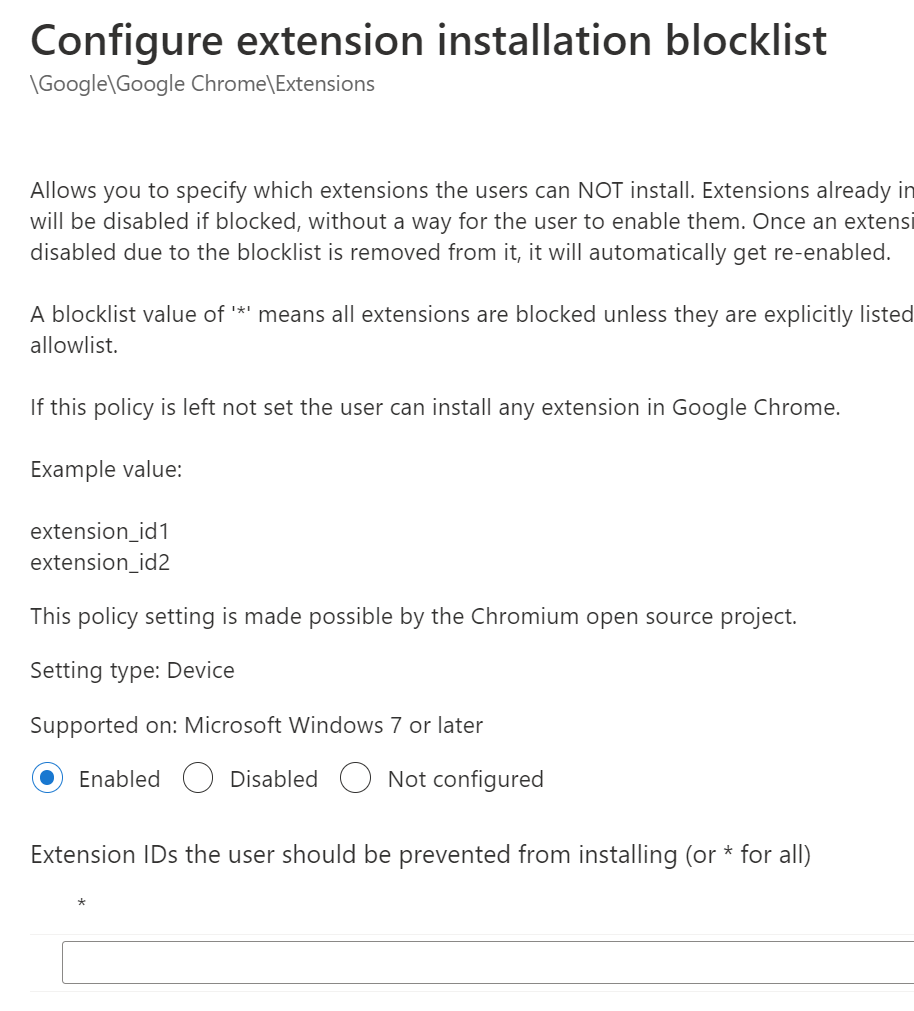
A basic Chrome extension configuration is usually set like this. You’ll block external extensions from being configured, you’ll only allow installing corporate-allowed applications, and you’ll force some extensions to the devices. Here you can find the policies’ names:
Blocks external extensions from being installed
Configure extension installation allow list
Configure extension installation blocklist
Configure the list of force-installed apps and extensions
Only allow approved extensions
First, we are going to configure the two following policies:
Configure extension installation allow list
Configure extension installation blocklist
The first one will be the allow list, and then we are going to block everything else from being run. The extensions you forced before with the silent install are automatically allowed. I’d still advise for adding them to this policy using the ID you retrieved before.
Use the following screenshot for reference.
The blocklist is usually configured as *, meaning any. All the allow-listed and forced extensions will be automatically excluded and take precedence. If you just wish to block some applications, paste the ID of the extensions you wish to block.
Block external extensions
Last but not least, let’s block external extensions. These are applications that can be manually packaged and installed into browsers. If you are not actively deploying some in your organization, I’d suggest blocking them.
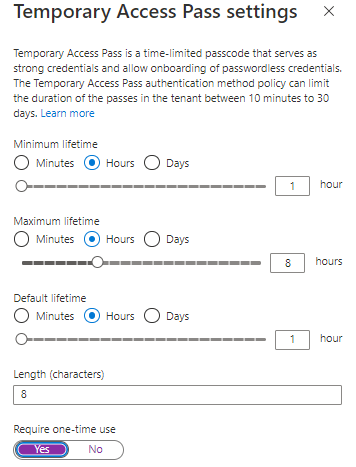
Temporary Access Pass is a time-limited passcode that allows users to register passwordless methods or recover access to their accounts without knowing their password. It is enabled via an authentication method policy that you can configure in Azure Active Directory. Apart from being time-limited, the TAP can also be configured for one-time use only. This can either be configured on the authentication methods policy so that every TAP created will be one time only (not the best idea at the moment) or at the creation of the TAP on the user authentication methods page.
The issue
The “Temporary Access Pass sign in was blocked due to User Credential Policy” issue is caused by the fact that the user has already used the TAP, and it was configured not to be valid for a second login. To fix this, modify the policy and allow for multi-use TAPs (if it’s not already enabled) then issue a new TAP.
While it makes sense from a general prospective to enable it for one-time use only at the policy level, this is usually impractical. For example, if you are using Autopilot, you’ll be requested to enter your credentials twice before configuring Windows Hello for Business. The first time, you’ll be asked for it at the enrollment phase, and the second time when logging into the user account for the first time. A one-time use TAP policy will create issues in this case. It’s also very common for users to mistakenly log off before configuring a passwordless method. If they do, you’ll need to issue a second TAP. For these reasons, it makes sense to allow a stricter lifetime but allow it to be used multiple times in that timeframe.
Security Defaults are one of the ways to establish a fundamental identity security baseline for your tenant. Security defaults are a set of security settings to help you protect your organization from the most common security threats. They can be enabled on a tenant with just one click. Well, two, if you count the save button. These settings are aimed at small and medium businesses that might not have an IT team with the knowledge or resources to manually set the standard for their environment.
If you are currently using Conditional Access Policies, Security Defaults are probably not for you. In more complex environments, going the Conditional Access way can be trickier to manage but provide more benefits, such as the ability to require access from known and compliant devices. Also, Conditional Access Policies require Azure Active Directory Premium P1, and only some organizations are licensed for it.
If you wish to learn more about Conditional Access, I wrote a post about it:
Security Defaults are now activated by default in all the newly created tenants since October 2019, and Microsoft is rolling them out to existing tenants who don’t have Conditional Access Policies enabled.
What Security Defaults will do is:
Requiring users to register for MFA using the Authenticator app. Users will have 14 days to comply before being required to do so.
Requesting MFA for both users and administrators, especially when a user accesses privileged portals.
Block legacy authenticationprotocols which can’t support MFA.
How to enable Security Defaults
Access the Azure AD properties with an admin account by clicking on the following link, or navigating through the portal to Properties: Azure AD Properties | Azure Portal
Click on Manage Security Defaults at the bottom of the page
Set the Security Defaults to Enabled
Save
How to disable Security Defaults
Access the Azure AD properties with an admin account by clicking on the following link or navigating through the portal to Properties: Azure AD Properties | Azure Portal
Click on Manage Security Defaults at the bottom of the page
Set the Security Defaults to Disabled
Provide a reason for disabling Security Defaults
Save
Notes
If you wish to learn more about Security Defaults, refer to the following documentation page:
In Azure Kubernetes Service (AKS) on Azure Stack HCI, you can increase the resources available to your node pool by changing the size of virtual machines in a node pool or expanding the node count. The node count can also be increased with autoscaling methods.
The worker nodes can be scaled using the command Set-AksHciNodePool, while the Set-AksHciCluster scales the control plane.
I’ll be going over scaling both using PowerShell in the following guide. You’ll need to open a PowerShell session on one of the Azure Stack HCI nodes to follow along. Replace the parameter values as needed.
Notes
As of January 2023, the scaling of the management cluster (the one created by AKS HCI automatically) is currently not supported.
Now that we have scaled up the control plane, we can scale the control plane node count. The default is 1. If you scale up the control plane, it will become highly available and will not accept any scale down back to 1 node⚠️
As we all know, passwords are a weak link in our identity processes. But, contrary to what we believe, your password length is not the main enemy when talking about Azure AD, as long as your passwords are not simple. Instead, the main enemy is that passwords can be easily gathered and reused from phishing attacks or breaches.
The most common attacks, for example, phishing, password spray and credential stuffing, all rely on the fact that your password is either given by the user to the attacker, guessed because it was really simple, or already exposed to attackers because of previous breaches in 3rd parties attacks. Also, in the case of password spray, Azure AD has functions in play to drastically reduce the speed of password spray attacks and increase the time attackers spend guessing a password.
Image from the Microsoft Docs
Regarding why your passwords mostly don’t matter, Alex Weinert, Director of Identity Security at Microsoft, wrote a wonderful article way back in 2019 that I suggest you read:
But, if you still need to start modernizing your application log-in processes, and most applications in your environment rely only on either Active Directory or Active Directory Federation Services, please still consider a more complex password. In this case, the standard is usually set at 15+ characters, as when a password is created of more than 14 characters, you don’t store the LM hash for it. Of course, you can also disable LM hashes with GPOs, but most places aren’t doing it.
The aim of this post, though, is to discuss Azure AD-connected systems, applications, and cloud-only environments.
If you haven’t heard of it, you can either natively attach most applications to Azure AD or use Azure AD Application Proxy. Azure AD Application Proxy allows Azure AD to take the reins by letting it manage the authentication and access to the on-premises legacy applications.
MFA does put a patch on the issue of passwords. For now, if everyone had (preferably strong) MFA on their accounts, the compromises would go way down, as the attackers’ costs would go way up. But, as we said, MFA is a patch, not a permanent fix.
For example, many companies still rely on legacy authentication methods, which do not support MFA, or there are cases where MFA gets “skipped” with the use of man-in-the-middle attacks (such as the ones that can be conducted using evilginx2). While it’s not really a “skip”, it’s functionally a bypass of MFA functions.
While passwordless methods are more secure and convenient, you should know that there is a better and worse ranking.
For example, adopting passwordless using the Microsoft Authenticator still puts you at risk of being phished with men-in-the-middle attacks, such as the ones we talked about before, and logging into Windows devices with the Authenticator is not supported at the moment.
Suppose you have a Conditional Access Policy that requires devices to be compliant. In that case, the Authenticator makes more sense as a passwordless method, as you add an additional layer of verification before accessing your company data.
Image taken from Microsoft Docs
Because FIDO2 Keys are not supported on mobile devices, the Microsoft Authenticator is still the best passwordless option for iOS and Android devices. It’s also a very common method for MacOS and Linux users.
As a side note, most of the time, instead of signing in with the Authenticator, on mobile you’ll be able to select “Sign-in options” and be presented with the option of signing in from another device, such as a desktop, where you’ll be able to use FIDO keys.
We’ll discuss the other two passwordless methods in the next chapter.
Windows Hello for Business and FIDO2 security keys
Windows Hello for Business and FIDO2 keys directly communicate with the service you are authenticating to. As such, they can only initiate the login flow if you are connected to the right page. And while this is already placing them up in the ranks, they can also provide access to Windows devices from the lock screen.
It’s worth noting that while Windows Hello for Business needs setup on every machine, FIDO2 keys can attach directly to the Azure AD user, making it way easier to use if the user is not always connected to the same device, as it happens with front-line workers. This happens because FIDO2 security keys store the credentials on the key, unlike Windows Hello for Business, where the key pair is bound to the TPM.
It’s also worth noting that Windows Hello for Business can (with some complex deployment options) also integrate with on-prem resources. One such use case is using Hello for Business with certificates to allow integration with the RDP protocol:
Here is a small table that recaps what methods are available, based on device type.
Device
AD FS or Azure AD native certificate-based authentication
FIDO2 security keys
Windows Hello for Business
Microsoft Authenticator with compliant device CAP
Windows device
iOS mobile device
Not applicable
Not applicable
Android mobile device
Not applicable
Not applicable
MacOS device
Edge/Chrome
Not applicable
While we are on the topic, you can configure users with a one-time-use Temporary Access Password to make users passwordless from day one, but the topic will be discussed further down.
A very useful page to plan your passwordless implementation is the following. It guides you through a wizard that proposes the best options for your use case depending on what your users use.
While not discussed here, Azure AD Certificate-based authentication is also a strong and phishing-resistant passwordless method. Since it's now natively integrated into Azure AD, it makes a lot of sense for companies that used to rely on ADFS to achieve the same passwordless result.
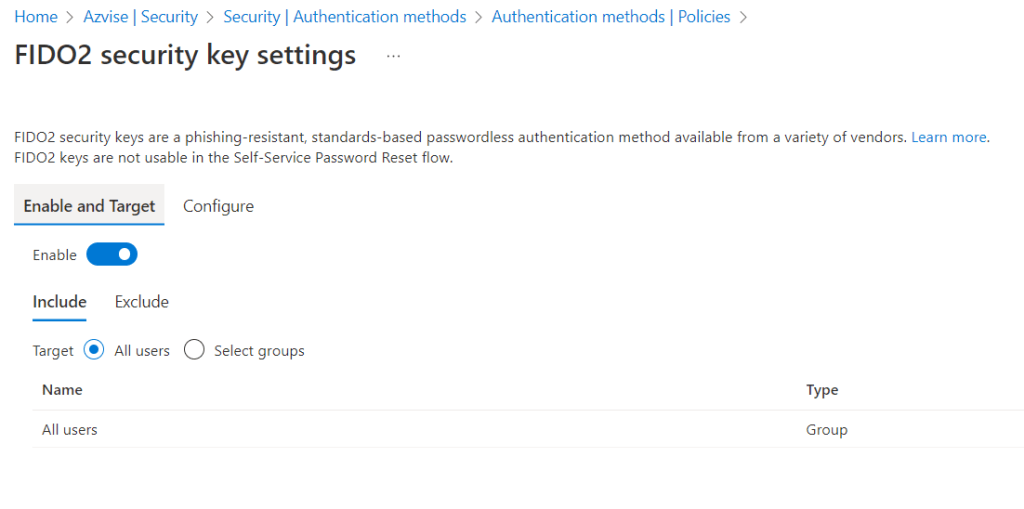
Enable FIDO2 security keys
To enable users to use FIDO2 keys, first sign in to the Authentication methods page, then click on FIDO2 Security Key:
From the menu, select “Enable“, then either “All users” if you want the entire organization to be able to use FIDO2 keys or scope the deployment to a specific group. You may also scope the feature to “All users” but exclude a specific group of people.
Under “Configure“:
You’ll generally want to leave “Allow self-service set up” set to “Yes“. This allows people to set up their keys.
“Enforce attestation” to “Yes“, as it allows to verify the quality and certifications of the key.
Enforce key restrictions to “No“, as it allows you to set which FIDO keys are allowed by the org and what keys are not.
Save and end the setup.
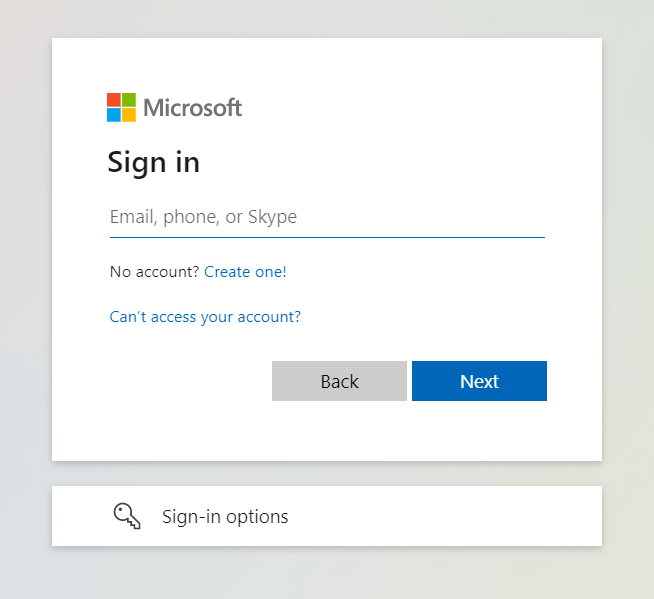
Register a FIDO2 key
Before registering a FIDO2 key, the user will be prompted to setup MFA. If you want the user to directly use FIDO2 keys as an authentication method, you can create a Temporary Access Password for them. This will skip the MFA prompt and let the user configure directly the key. To create a TAP, follow this guide: Configure a Temporary Access Password | Entra
If you are using Temporary Access Passwords, the user will be prompted to use it to authenticate.
If the user had MFA configured, the user will be able to configure the FIDO2 keys directly
If the user is authenticating with password-only, the user will be prompted to configure MFA as an additional step.
Click Security Info. In this case the user had MFA configured, so we can go straight to FIDO2 keys.
Click on “Add method“, then “Security key”.
Click on either “USB device” or “NFC device”. In my case, using a YubiKey 5 NFC, I’ll select USB, since I have it attached to the device. Note that this is just for registration, any method can be used for signing in after registration.
Insert the key, then press “Next“.
You will be redirected to a browser prompt, asking you to create a passkey. Select “External security key or built-in sensor“
If prompted, accept the following pop-up.
Create a PIN for your Security Key, then perform the gesture, such as touching the sensor.
Now give the key a name, so that you may recognize it. I generally suggest the ” Vendor + model” naming convention.
Click Done.
Now if you log-off, you’ll be able to test out the new key.
Test the FIDO2 key
Once you are done with the setup, try signing in with the key. To do that:
Access office.com or any other portal, then select “Sign-in options“.
Select “Sign in with Windows Hello or a security key“. This might come up as just “Sign in with a security key“.
Attach your Security Key, then insert your PIN
Perform the gesture, such as touching the sensor.
If all went well, you’ll access the portal.
Configure security keys as a sign-in option in Windows
Before starting, please be aware that for sign-in in Windows, you’ll need the machine to be at least version 1903. There are no requirement on the join type, as FIDO2 keys can be used for both Azure AD Joined devices and Hybrid-AAD Joined devices.
Enable with Intune for all users
To use FIDO2 keys on Windows devices for all users in your tenant:
Either click on the following link, or access Intune, then click on “Enroll devices”, “Windows Hello for Business”. Windows devices enrollment | Intune
Click on Use security keys for sign-in, and set it to Enabled.
Targeted Intune deployment
To target specific device groups to enable the credential provider, use the following custom settings via Endpoint Manager:
Once you are done, configure the Assignments, then complete the wizard.
Enable with Group Policy
If you are not using Intune, you can enable the feature using GPOs. In this case only Hybrid Azure AD Joined devices are supported. Once you have created the GPO, the setting is located under Computer Configuration \ Administrative Templates \ System \ Logon. Next, click on Turn on security key sign-in, and set the policy to Enabled.
Force sync on a single device
If you want to test things out after applying the Intune policies, run the following command from your local PowerShell or force sync from Intune. Both will sync your settings with Intune.
Get-ScheduledTask | where {$_.TaskName -eq 'PushLaunch'} | Start-ScheduledTask
Windows Hello for Business deployment for AAD joined devices
An option for configuring WHfB is by using Intune device enrollment. The settings are placed under Windows enrollment settings and only allow scoping to all users.
If you want to do it more granularly, you can deploy a configuration policy that will do the trick. Note that the configuration policy has more options, such as “PIN recovery” and “Certificate for on-premise resources”.
For reference, you can also create GPOs and configure hybrid and on-premises services to deploy Windows Hello for Business, but that won’t be discussed in this article as it would be worth a dedicated article.
For all users
Either click on the following link, or access Intune, then click on “Enroll devices”, “Windows Hello for Business”. Windows devices enrollment | Intune
Click on Use security keys for sign-in, and set it to Enabled. Enabled will configure WHfB for all devices. Not configured will be used if you still want to use the feature but you don’t want Intune to manage it.
Review the image below and use it freely as a template for the settings. This is one of the better defaults I’ve come up with, but some settings will depend on your organization’s standards. One note, it’s generally a good idea to require TPM if your devices support it.
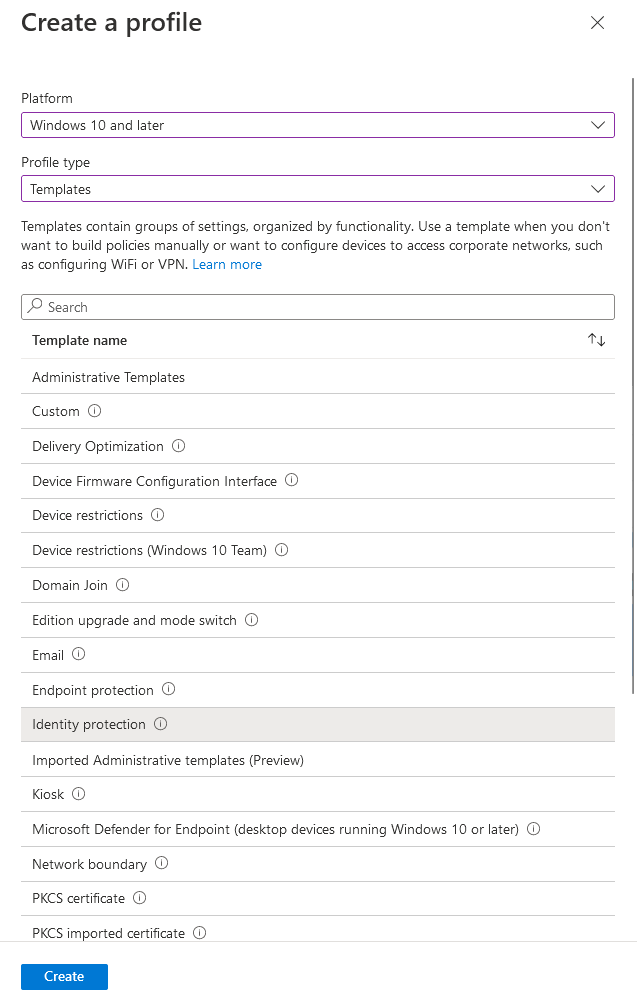
Select Create a profile, then click on Windows 10 and later, Templates, Identity protection.
Give the policy a name, then click Next
As before, this is one of the better defaults I’ve come up with, but some settings will depend on your organization’s standards.
Once you are done, configure the Assignments, then complete the wizard.
Force sync on a single device
If you want to test things out after applying the Intune policies, run the following command from your local PowerShell or force sync from Intune. Both will sync your settings with Intune.
Get-ScheduledTask | where {$_.TaskName -eq 'PushLaunch'} | Start-ScheduledTask
Conclusion
I hope this post was useful to you. If you spot any mistakes, feel free to reach out to me on Twitter or Linkedin.
Conditional Access Policies (CAPs) are identity-driven policies that govern user access to resources based on certain conditions. We can summarize them as if statements that govern what will be requested, enforced or blocked. As identity has become a key focus for security efforts, it’s essential to manage it in the best way possible.
All policies “think” at the user level and are enforced after a user has completed the first form of authentication, such as entering their username and password. As such, an attacker could understand if the credentials are correct even if there are blocks dictated by CAPs that might block access based on various signals.
Conditional access policies are implemented using Azure Active Directory, which is the cloud-based identity and access management service that is part of Microsoft 365. As of right now, Azure Active Directory (or Azure AD for short) is being integrated into the newly created Entra product family.
It’s important to note that Conditional Access Policies will manage not only native Microsoft apps such as SharePoint, Teams, the Azure Portal, etc. but also all SaaS applications connected to Azure AD and all on-premises applications managed through Azure AD Application Proxy.
This can simplify the management of identities, as, for example, the user will have their MFA methods set in Azure AD, and they’ll be requested on all connected apps in Azure AD for which you have set Azure AD as the identity provider.
In most organizations, the CAPs enforce requirements such as the enforcement of MFA, the block of logins using legacy protocols and requiring a compliant device to access company resources.
It is advisable to create or make changes to CAPs only if you have a basic understatement of the service and always operate with caution since you could risk blocking access to the tenant for all users.
Please consider implementing an emergency administrator before starting with Conditional Access, and exclude it from all the policies. Read more regarding this here:
All Conditional Access policies must grant a user access before they can access a cloud app. If one of the CAP blocks the sign-in, the request will be denied. Note that if in the same policy you both include and exclude a user, the user will be excluded.
I wrote a post on how to check which policy is blocking a user sign-in. If you are curious, you can check it out here:
If you are creating a new policy, it can be set to “Report-only” mode first. This will allow you to use insights and reporting workbooks to evaluate the impact of the policy before you go on to apply it to everyone in the organization by turning it “On”. Alternatively, you can keep the policy inactive by setting it to “Off”. Please note that a certificate request might pop up on Macs or mobile devices if you require a check for Intune compliance in the policy, even if it’s in report mode.
Licenses and Security Defaults
As Conditional Access Policies require Azure Active Directory Premium P1, only some organizations are going to be able to use them. If you are not licensed for it, you use Security Defaults to establish a basic security baseline for your tenant. Security Defaults are now activated by default in all the newly created tenants. What Security Defaults will do is:
Requiring every user to register for MFA. Once enabled, users will have 14 days to register before being required to do so.
Requesting MFA for both standard users and administrators, especially when a user accesses privileged portals.
Block legacy authentication protocols which can’t support MFA.
Templates and JSON
There is currently a set of recommended policies that you can deploy right away by clicking on “New policy from template” at the following link:
While the templates are a very quick and easy way to start with CAPs, please exercise extreme caution. Even though they are created in report-only, they will not, for example, create a break glass admin and exclude it by default. If you mess up, you might end up locked out. Also note that it’s best to exclude users from CAPs using groups so that you don’t have to modify the policies constantly, which might end up in errors.
A cool new feature is the ability to implement CAPs using JSONtemplates. You’ll be able to export the policies you have created and be able to import them back in case anything happens.
To learn more, refer to the following documentation:
SMS-based authentication allows users to log in without needing to remember their username and password. After enabling the feature for an account, users can enter their phone number at the login prompt instead of their username. They will then receive an authentication code via text message that they can use to complete the login.
This service is often mistaken for SMS-based Multi-factor Authentication, but they are not the same.
This authentication method makes it easier for frontline workers to access applications and services. It’s not recommended to enable this feature for users who could use other passwordless methods or a combination of credentials + MFA. It’s also important to note that the desktop Office apps do not support SMS-based auth. Therefore, you can only use the web app version of the apps and only by logging in via office.com. You also cannot use the mobile version of the apps, except for Teams, Company Portal and Microsoft Azure.
If you decide to enable the feature, you should consider limiting and standardizing the frontline worker’s permissions to what’s necessary.
If you are curious why you should prioritize other methods over phone-based auth, consider reading this always relevant article by Alex Weinert:
Click on SMS (Preview). The feature is not in preview anymore, even if the portal states so at the moment of writing this guide.
Click on “Yes” under “Enable”, then “Select groups”, and select the group you created in the first step. Complete the step by clicking “Select” and “Save”.
To set a phone number, go into All Users | Azure AD, then select a member of the group you created in the first step.
Go into “Authentication methods”, then click “Add authentication method”. From there, select “Phone number” and insert the phone number the user will use to sign in, then click “Add”.
You can also add an authentication method via PowerShell:
# Replace the variables with the user you wish to add the auth method to and phone number you wish to assign

$User = "user@example.com"
$PhoneNumber = "+1 111111111"

Install-module Microsoft.Graph.Identity.Signins
Connect-MgGraph -Scopes UserAuthenticationMethod.ReadWrite.All
Select-MgProfile -Name beta

New-MgUserAuthenticationPhoneMethod -UserId $User -phoneType "mobile" -phoneNumber $PhoneNumber

# Get the phone number of the user

Get-MgUserAuthenticationPhoneMethod -UserId $User
If you need to script this for multiple users, you can refer to the code below.
This script assumes you created a CSV file in “C:\” named contacts.csv, and that the CSV file has a column named UserName and a column named PhoneNumber. If your CSV file has different column names, you will need to update the script accordingly.
# Install the modules and login to Graph

Install-module Microsoft.Graph.Identity.Signins
Connect-MgGraph -Scopes UserAuthenticationMethod.ReadWrite.All
Select-MgProfile -Name beta

# Import the CSV file containing names and phone numbers

$contacts = Import-Csv -Path "C:\contacts.csv"

# Loop through each user and add their phone number for authentication
# If you changed the column names, replace these placeholders with the actual column names from the CSV file


foreach ($contact in $contacts)
{
    $User = $contact.UserName
    $PhoneNumber = $contact.PhoneNumber
    New-MgUserAuthenticationPhoneMethod -UserId $User -phoneType "mobile" -phoneNumber $PhoneNumber
}
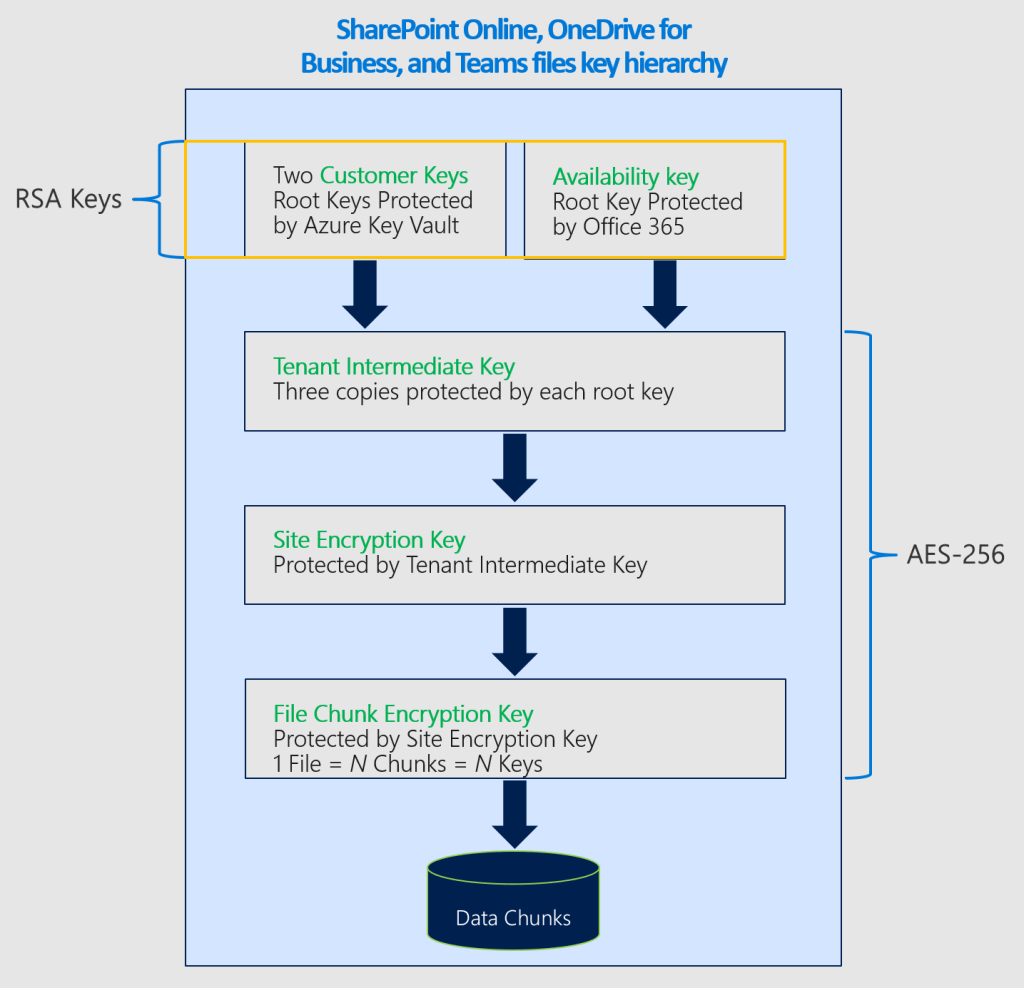
Microsoft Purview Customer Key (or Customer Key for short) is an encryption service mainly aimed at resolving regulatory issues with the adoption of Microsoft 365. This is the product you need in the Microsoft Cloud environment if you have a regulatory requirement to have ownership and control over the keys used to encrypt data at rest.
Microsoft 365 already provides volume-level encryption through Bitlocker and Distributed Key Manager (DKM), but you have no control over the encryption keys used. Customer Key can encrypt with your keys data from Exchange Online, Skype for Business, SharePoint Online, OneDrive for Business, and Microsoft Teams. The Microsoft services will use your key to make the various systems work.
You’ll have the option to let Microsoft generate your RSA Keys or upload your own. All the key management capabilities are done through Azure Key Vault. Once Microsoft checks that everything is going well, Microsoft 365 uses your keys to encrypt data at rest.
While Customer Key adds additional security against unauthorized access to data, it’s not intended to restrict Microsoft employees’ ability to access your data. Instead, that feature is provided by Customer Lockbox. Customer Lockbox ensures that Microsoft can’t access your data without your consent.
Critical Considerations
Once you encrypt SharePoint Online, OneDrive for Business, and Teams, there is no going back to Microsoft Managed Keys.
The loss of the root encryption keys can have catastrophic consequences. Various precautions can be taken to avoid common errors but keep this in mind.
Microsoft keeps an availability key, which functions the same as your two keys. This key is used by automated processes and aims to provide recovery capabilities from the loss of the root keys you manage. To learn more follow this link: Availability Key in Customer Key | Microsoft Docs
Features limited by this service
None that I’m aware of
General Requirements
PERMISSIONS:
Being a Global Admin for the tenant
REQUIRED LICENCES: (One of the following types)
Office 365 E5
Microsoft 365 E5
Microsoft 365 E5 Compliance
Microsoft 365 E5 Information Protection & Governance SKUs
Microsoft 365 Security and Compliance for FLW
AZURE:
Generally, the ability to create Subscriptions and an Owner role in those subscriptions. The subscriptions will host the Azure Key Vaults that will contain your keys.
Ability to create Azure Subscriptions and Resource Groups
Ability to modify permissions on Azure Subscriptions and on resources
Ability to create and manage Azure Key Vaults and related keys
Tips
You can leverage the Hardware Security Module (HSM) key protection by using a Premium Key Vault
Conditional Access Policies (CAPs) are identity-driven policies that govern user access to resources. We can summarize them as if statements that govern what will be requested, enforced or blocked.
In most organizations, the CAPs govern the enforcement of MFA, the block of logins using legacy protocols, and requiring a compliant device to access company resources.
All policies “think” at the user level.
It is advisable to make changes to CAPs only if you have a basic understatement of the service, since you could risk blocking access to the tenant for all users. In order to learn more, refer to the following documentation:
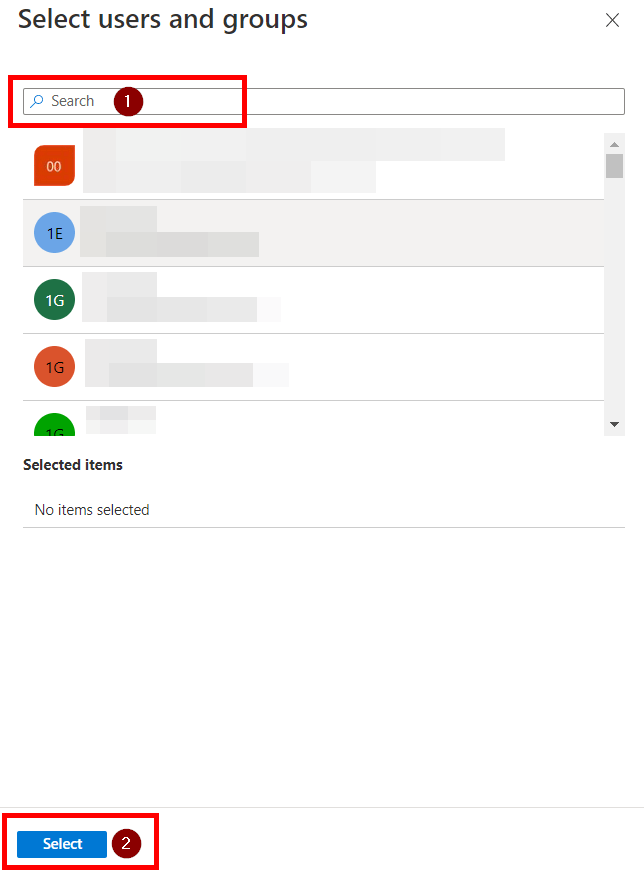
If you intend to add a user to the policy, click on the blue link under “Users or workload identities”, then “Include,” and click the blue link under “Users and groups”.
Select or search for the desired user, then click “Select.”
If you want to exclude a user, click on the blue link under “Users or workload identities”, then “Exclude,” and click on the blue link just below “Users and groups.” The same user selection screen shown in the previous step will open. Search for and select the user, then click “Select.”
Once done, save using the “Save” button at the end of the page. If the policy is in “Report-only” or “Off“, the flow is not active.
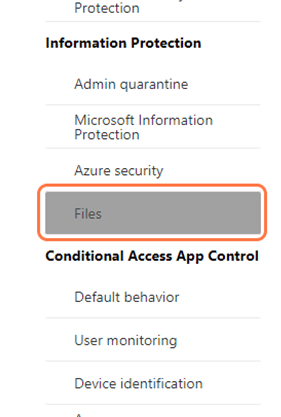
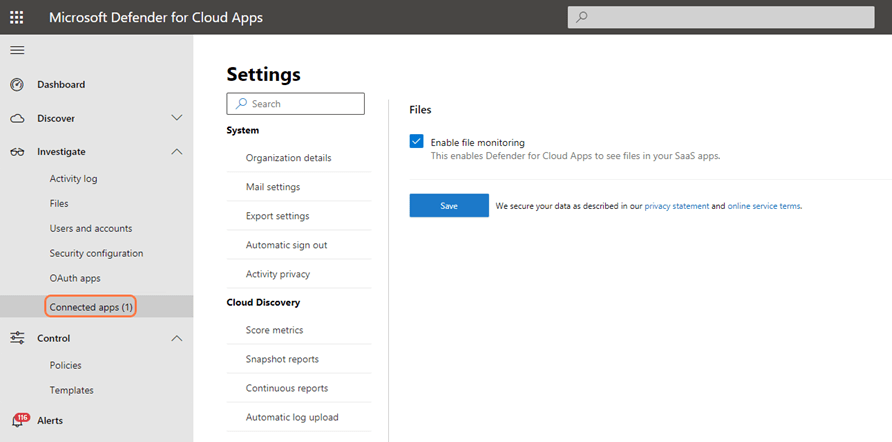
Before enabling file monitoring in Defender for Cloud Apps, be sure to have the appropriate licensing assigned. To follow these steps, you’ll need the following:
An Information Protection licence
A full Defender for Cloud Apps licence. A Microsoft Defender for Cloud Apps Discovery license is not enough.
Please note that you’ll have to create a file policy as soon as you enable the feature. If you don’t create a file policy in the first seven days, the feature will be disabled.
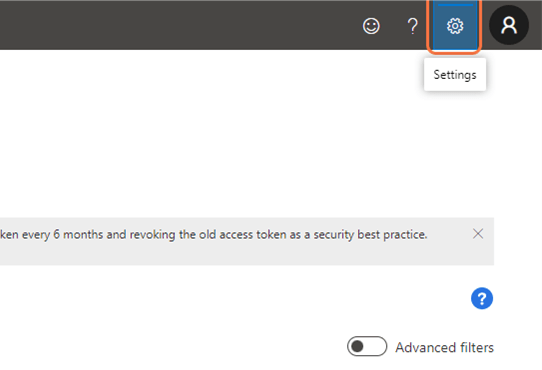
First, log into the Defender for Cloud Apps portal:
The following script will get all the members of an Azure AD group and add them to another group. You’ll just need to know the name of the two groups to make it work.
In the code shown below, the source group will be called Group1Name and the destination one Group2Name.
# Replace Group1Name with the name of your source group and Group2Name with the name of the destination one. Everything else will be done automatically

$Group1 = "Group1Name"
$Group2 = "Group2Name"


$group1ObjectID = Get-AzureADGroup -Filter "Displayname eq '$group1'" | Select objectid -ExpandProperty ObjectID
$group2ObjectID = Get-AzureADGroup -Filter "Displayname eq '$group2'" | Select objectid -ExpandProperty ObjectID

$membersGroup1 = Get-AzureADGroupMember -ObjectId $group1ObjectID -All $true

foreach($member in $membersGroup1)
{
    $currentuser = Get-AzureADUser -ObjectId $member.ObjectId | select objectid
    Add-AzureADGroupMember -ObjectId $group2ObjectID -RefObjectId $currentuser.objectid

}
Get-AzureADGroupMember -ObjectId $group2ObjectID -All $true
Suppose you or a user reset a password, and one of the following errors comes up. In that case, it means that either you are using a guessable password or that somebody in your organization has enabled Password Protection in your environment, and you are using a banned word.
Unfortunately, your password contains a word, phrase or pattern that makes it easily guessable. Please try again with a different password.
“Unable to update the password. The value provided for the new password does not meet the length, complexity, or history requirements of the domain.”
If you are a user, please try a more complex password to circumvent the error. Substituting @ with A, 1 with I, and other widespread ways of changing up a common word will not be counted as “not including a common word”.
If you are an admin, please note the following about this feature. Users often create passwords that use common words based on personal interests or easily rememberable things (e.g. cities, sports teams, celebrities, months, etc.). These passwords are strongly vulnerable to dictionary-based attacks. Azure AD Password Protection, which works either in a “cloud-only” mode or can also synchronize to on-prem, provides a global and custom-banned password list. The global one is maintained directly by Microsoft; the custom one can be modified by the Microsoft 365 / Azure AD admins.
To remove a user profile in Azure Virtual Desktop, you must first be sure that the user is logged off. If you are unsure on how to do it, follow the guide below.
After you’ve checked this, you got two options based on the type of profile architecture you chose to implement.
If the profiles are stored locally, you can proceed to remove them as you’d do in standard W10 machine.
If you are using FSLogix, which is the recommended way to handle them, you can proceed to remove the user folder from the Azure File Share.
If you are unsure about which type of user profile solution you use, you can log in to a standard user account (preferably the one you wish to remove) and follow the guide below.
If you fall under the first option, log into the AVD instance/instances with an admin user account, open “Run“, then type netplwiz.exe and click enter. This will open the Advanced User Accounts Control Panel. From there, you’ll get a list of all the users. Next, click on the user profile you’d like to delete and click “Remove”. You’ll have to repeat this procedure for all the AVD hosts in your environment.
If you are running FSLogix, log into the Azure File Share hosting your profiles, then locate the user folder you wish to delete. Usually, the format is either %username%%sid% or “%sid%%username%, depending on whether you have added the FlipFlopProfileDirectoryName registry in the FSLogix configuration (FlipFlopDirectoryName | AVD). Once you have found it, open it, and delete the VHD/ VHDX stored inside, as per the screenshot below. After the VHD deletion has been completed, delete the user profile folder.
This error message results from the application of a Conditional Access Policy on your tenant that blocks users from accessing cloud resources using a non-compliant device. The compliance state of a device is evaluated by Intune. To check which compliance policies you have active in your environment, head to:
To resolve the issue, either fix the device’s compliance state or exclude the user from the Conditional Access Policy.
To fix the compliance state, head into All Devices | Intune, click on the impacted device, and then “Device Compliance“. From there, you can see which policy makes the device not compliant and which setting is “at fault”.
If you are looking to understand which Conditional Access Policy is blocking the user, check out this guide:
This error message results from the application of a Conditional Access Policy on your tenant that blocks users from accessing cloud resources without a hybrid-joined device. A Hybrid-joined device is an AD-joined client which gets synchronized to Azure AD via Azure Active Directory Connect (AD Connect).
Another version of this error is:
Try signing in another way To access your service, app, or website, you may need to sign in to Microsoft Edge using XX account
If you are looking to understand which Conditional Access Policy is blocking users, check out this guide:
If the user is trying to access with a personal device, switching accounts (as suggested in the error message) won’t fix the issue. You’ll need a company owned device.
If the user is trying to access it with a company device, then it’s either:
Using a personal account, or using the wrong company account. Click on Sign out and sign in with a different account, then sign in with the correct account.
Using the right company account, but using Chrome. If this is the case, follow the steps below.
Using the right company account on Edge (or on Chrome with the proper extension installed), but the device is not synchronized. To fix this, check if you are synchronizing said device and consider adding it to the right OU / add the right attribute to let it sync.
If you are using Chrome, you’ll either need the Windows Accounts or the Microsoft 365 extensions. These extensions allow Chrome to pass device-specific details. You can deploy the extension automatically using this registry key:
Please note that the “Hybrid join check” type of access control is usually paired with a device compliance check. So expect a possible further block related to this. To learn more, visit Get started with device compliance | Intune or read my article on the related error: